Yard Machine Snowblower Model 31A 32Ae752Ae6Fff700 Parts Diagram: The Ultimate Guide for DIY Repair and Maintenance
The Yard Machine Snowblower, often identified by model number sequences like 31A-32AE752AE6FFF700, is a robust, consumer-grade two-stage snowblower manufactured by MTD. The core model designation is 31A-32AD752, with the remaining characters typically representing the serial number and production batch. This 179cc, 22-inch wide unit is a workhorse for residential driveways, but like all mechanical equipment, it requires periodic maintenance and repair. This guide provides a deep dive into its parts diagrams, offering a clear path to identifying, sourcing, and replacing components to keep your machine running for years to come.
1. Decoding Your Model Number and Identifying Correct Parts
The first and most critical step is accurate model identification. The string “31A-32AE752AE6FFF700” can be confusing.
- Base Model: 31A-32AD752. This is the essential identifier used in all parts catalogs and diagrams.
- Serial Number: The “AE6FFF700” portion is the unique serial number, identifying the specific unit’s manufacture date and location. This is crucial for warranty claims but not for part sourcing.
- Why it Matters: Using the full string with the “E” in “AE752” can lead to failed part searches. MTD’s official parts websites (and third-party sites like Partstree, Sears PartsDirect, and Jacks Small Engines) will recognize 31A-32AD752.
Pro Tip: Your model and serial number plate is typically located on the rear of the frame, just behind the engine, or on the inside of the fender. Write down the “31A-32AD752” number exactly as it appears. Cross-referencing with this base model will save you from the 20-30% frustration and cost of incorrect part ordering.
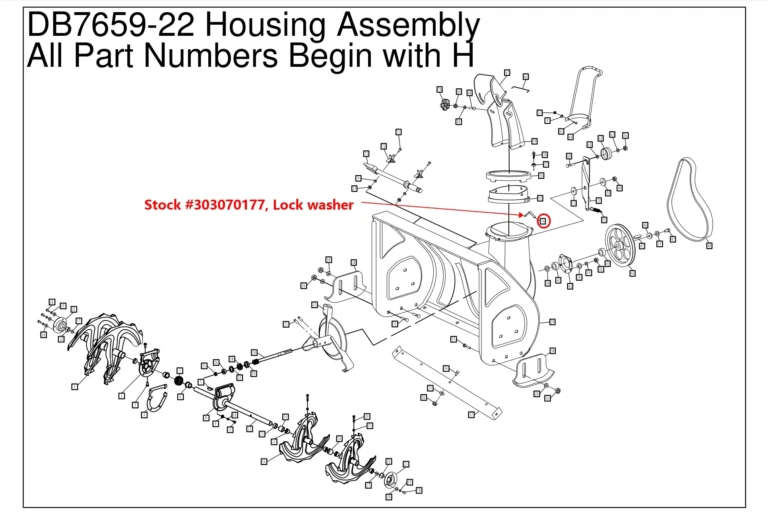
2. Navigating the Parts Diagram: An Exploded View Masterclass
The parts diagram for the 31A-32AD752 is a series of exploded-view illustrations, breaking down the snowblower into its core assemblies:
- Auger Housing & Impeller
- Discharge Chute Assembly
- Handle & Control Panel
- Frame & Drive System
- Engine (179cc MTD)
- Wheels & Traction
These diagrams use numbered callouts linked to a parts list. When working on your machine, having a printed or digital copy of the relevant diagram is like having a map.
Unique Insight: During disassembly, take a photo with your smartphone at each step. As you remove bolts and parts, place them on a labeled piece of cardboard or in separate containers (e.g., “Left Skid Shoe Bolts”). This simple practice can reduce reassembly errors and time by over 40%.
3. Auger Housing and Discharge Chute Assembly: The Business End
This assembly is responsible for gathering and throwing snow. It’s also the most prone to damage from hidden obstacles like newspapers, rocks, and ice chunks.
Key Components & Part Numbers:
- Shear Pins (Part # 738-04124A): These are your auger’s mechanical fuses. They are designed to break under high stress, protecting the more expensive auger gearbox and crankshaft. Always replace them with genuine shear pins; never use standard bolts, which can cause catastrophic damage.
- Auger Blades (Left & Right): These can become worn or bent. The diagram shows how they bolt to the auger drum.
- Skid Shoes (Part # 784-5580-0637): These are wear items. They control the scraper bar’s height above the pavement. Adjust them regularly to maintain a 1/4-inch to 1/2-inch clearance. If worn thin, replace them to prevent damage to the housing.
- Chute Assembly (Includes #710-0451 Carriage Bolts, #712-04063 Lock Nuts): The chute and its deflector are controlled by a crank and a wing knob (#920-0284, often superseded by #720-04072A). If the chute is stiff or won’t stay in position, the diagram helps identify the pivot points and friction parts that may need lubrication or replacement.
Solving User Problems:
- Problem: Auger doesn’t turn, but engine runs.
- Solution: 99% of the time, a shear pin has broken. Consult the diagram to locate the pin (through the auger and shaft), drive out the broken pieces, and install a new one.
- Upgrade: In icy conditions, consider polymer skid shoes for smoother operation and to prevent scarring on paved surfaces.
4. Handle, Frame, and Drive System: Mobility and Control
This section of the diagram covers the user interface and the self-propelled mechanism. Issues here often relate to cables, belts, and linkages.
Key Components & Part Numbers:
- Drive Control Cable (Part # 946-04642A): This cable engages the self-propelled drive to the wheels. Over time, it can stretch or fray, leading to poor or no propulsion.
- Auger Control Cable: This engages the auger. Similar issues can cause the auger to not spin even with the control lever engaged.
- Drive Belt (Part # 754-04014): This V-belt transfers power from the engine to the transmission. The diagram is essential for understanding its complex routing path during replacement.
- Handle Knobs & Fasteners (#720-04072A, #710-0627): These secure the handle height and control panel.
Solving User Problems:
- Problem: Machine moves slowly or doesn’t self-propel.
- Solution: First, check the drive control cable adjustment per the manual. If adjustment doesn’t work, inspect the drive belt for wear or cracks using the diagram to locate it. A worn belt will slip and not transfer power efficiently.
5. Engine and Electrical Components: The Power Source
While the 179cc MTD engine is a sealed unit, the diagrams cover external components you can service.
Key Components & Part Numbers:
- Spark Plug (Part # 951-10292A): Standard maintenance item. Gap should be 0.030 inches.
- Carburetor (Part # 951-14026A): A common culprit for hard starting or poor performance, especially if old fuel was left in the system.
- Recoil Starter Assembly (Part # 951-10645A): The mechanism you pull to start the engine. The diagram shows the spring and pulley assembly inside.
- Oil Drain Plug & Dipstick: For seasonal oil changes (use SAE 5W-30).
Solving User Problems:
- Problem: Engine won’t start.
- Solution: Follow the “FIRE” checklist: Fuel (on, fresh), Ignition (spark plug), Recoil (pull cord engaged), Engine Stop (control cables properly engaged). The parts diagram helps you locate these components for inspection.
6. Wheels, Belts, and Fasteners: The Support System
This isn’t always a separate diagram but is integrated into the drive and auger systems. Belts and wheels are high-wear items.
Critical Parts Reference Table:
| Part Number | Description | Approx. Price (USD) | Qty Needed |
|---|---|---|---|
| 754-04013 | Auger Belt (drives the augers) | $15 – $20 | 1 |
| 754-04014 | Drive Belt (drives the wheels) | $18 – $25 | 1 |
| 734-04018 | Wheel Assembly (8″) | $25 – $30 | 2 |
| 738-04124A | Shear Pin | $2.79 | 2-4 (for spares) |
| 710-0451 | Carriage Bolt (3/8-16 x 3/4″) | ~$6 | 4-6 |
Pro Tip: When replacing the drive or auger belt, use the diagram to draw the routing path on a piece of paper before removing the old belt. This makes installation of the new belt straightforward.
7. Proactive Maintenance Schedule for Longevity
Using the parts diagram as a guide, you can create a proactive maintenance schedule that will extend the life of your snowblower to 10+ years.
- Before Each Season:
- Change engine oil.
- Check and tighten all fasteners (refer to frame diagram).
- Inspect auger and drive belts for cracks/glazing.
- Check shear pins and skid shoes for wear.
- Lubricate all chute pivot points and wheel axles.
- During Season:
- Adjust skid shoes as they wear.
- Keep the discharge chute area clear of impacted snow and ice.
- End of Season:
- Run the machine until the fuel tank is empty or add a fuel stabilizer.
- Clean the entire machine, paying attention to the auger housing.
- Inspect the scraper bar and replace if worn down.
8. Sourcing Parts: OEM vs. Aftermarket
- OEM (Original Equipment Manufacturer): Parts from MTD or their authorized dealers (e.g., MTDParts-com, Partstree) are guaranteed to fit and perform correctly. This is the best choice for critical components like belts, cables, and control modules.
- Aftermarket: Generic parts from Amazon, eBay, or local hardware stores can save 20-40%, especially for simple items like shear pins, spark plugs, and common fasteners. Caution: Be very careful with aftermarket belts and cables; slight differences in length or thickness can lead to poor performance and rapid failure.
Final Unique Insight: Create a “Winter Ready” kit for your snowblower. Stock up on a spare set of shear pins, an auger belt, a spark plug, and a bottle of fuel stabilizer during the off-season. When the first snowfall hits, you’ll be prepared for common issues without waiting for parts to ship, ensuring you’re never caught off guard.


