
How to Clean a CNC Machine
A shop-floor procedure for operators and maintenance techs. It covers the order of work, the solvents that are safe on each surface, and the spots where a careless wipe costs you a spindle or a seal. Read it once, then keep it near the machine.
In this article
- 1
- 2
- 3
- 4
- 5
- 6
- 7
- 8
- 9
What matters most
Shut down and lock out before anything gets wet
Cleaning a machine that can move is how people lose fingers. Press cycle stop, home the axes, then switch off the main breaker. Apply your lockout tag and keep the key in your pocket. On a mill-turn or a 5-axis center with a pallet changer, also pin or mechanically block the rotary table so it cannot index while you are leaning inside.
Let the spindle cool for 20 to 30 minutes before you touch it. A spindle that just ran at 12,000 rpm sits near 55–65 °C at the nose. Wiping a hot taper with a solvent-soaked rag pulls heat out unevenly and can leave a residue film you will chase for weeks.
Gather the right consumables before you start: lint-free wipes, a nylon-bristle brush, a chip hook, a wet/dry vacuum rated for coolant, and a small container of way oil. Do not use shop rags that shed fibers. A single thread wrapped around a ball screw is enough to change the pitch error on a long axis.
Check the machine manual for anything the builder calls out as sealed or non-serviceable. Some linear guide covers and absolute encoder housings should never be opened by the operator. If the manual says a subsystem is sealed for life, clean around it and leave it alone.
Worktable, T-slots, and fixture cleanup
Start at the table because everything above it will drop onto it later. Pull the vise, clamps, and fixture plates off and set them on a bench. Use a chip hook to drag strings of aluminum or steel out of the T-slots before you brush. Compressed air at low pressure, under 2 bar, is fine for the table surface but keep the nozzle pointed away from the taper and the way covers.
Fine chips pack into T-slot corners and set up like concrete once coolant dries on them. A nylon brush with a little coolant or a mild water-based cleaner loosens them. Avoid wire brushes on a ground table surface. You will remove the scraped finish and create a low spot that shows up as a 0.02 mm height error across a fixture.
Wipe the table dry and run a stone or a fine oilstone lightly over any burrs around T-slot edges. Then apply a thin film of way oil. A dry cast-iron table starts to flash-rust within a shift in a humid shop. If your shop runs above 70% relative humidity, this step is not optional.
Fixture plates, vises, and angle plates get cleaned separately. Check the locating faces with a straightedge before they go back on. A chip trapped under a vise jaw pushes the whole part and you will chase the error in the CMM report instead of at the source.
Spindle taper and tool holder care
The taper is the one surface where cleaning discipline directly shows up in part quality. On a BT30, BT40, or HSK holder, any chip or dried film between the taper and the spindle nose adds runout. A 0.005 mm chip sits like a wedge and can push TIR past 0.01 mm at the tool tip.
Clean the spindle taper with a lint-free wipe wrapped on a wooden or plastic stick. Work from the small end outward so debris exits the taper. Do not spin the wipe inside the taper with your fingers; you cannot feel a burr that way and you may polish a high spot into the seat. Clean the holder tapers the same way, and inspect the retention knob threads.
Inspect the taper surface under a light for fretting, discoloration, or a ring of polished metal. A blued ring near the gauge line usually means the holder is not seating fully. That is a taper or drawbar problem, not a dirt problem, and cleaning will not fix it.
Never use a solvent that leaves an oily film on the taper. Acetone or an approved taper cleaner only, then let it flash off for a minute before you load a holder. Grease on a taper is worse than a dry one because it collects chips and holds them in place.
Chip conveyor, coolant tank, and filtration
A dirty coolant system contaminates parts, wears tools, and grows bacteria that clogs filters. Pull the chip conveyor or run it in reverse to dump the bin. Scrape the fines out of the settling area at the discharge end. Fines that sit in the tank turn into sludge and starve the pump inlet.
Check coolant concentration with a refractometer once a week. For a water-miscible fluid, 6–10% is the working range for most steel and aluminum jobs. Below 5% you get rust on the table and rancid smell. Above 12% you get foaming, skin irritation, and oily residue on finished parts. Measure pH with a strip; keep it between 8.5 and 9.5.
Skim tramp oil off the top of the tank. Way oil and hydraulic oil that ride the coolant into the tank feed anaerobic bacteria. A belt skimmer running an hour a day removes most of it. If the coolant smells sour, do not just add fresh mix. Dump, clean the tank, and recharge. Partial top-ups on a soured sump never recover.
Clean the filter screens, bag filters, and any cyclone or paper filter media at the same time. A restricted filter raises pump pressure and drops flow at the nozzles. On a high-pressure through-spindle system, that shows up as poor chip evacuation in deep holes and broken drills.
Control cabinet, panels, and post-clean lubrication
Electrical parts require gentle cleaning to avoid damage to sensitive circuitry. The operator door and pendant can be wiped with a damp cloth and a mild cleaner. The cabinet interior is a different story. Open it only if you are qualified. Use a dry brush and a vacuum with a plastic nozzle rated for electronics. Never blow air into a cabinet; you push conductive dust into relays and drives.
Check the cabinet fan filters and the heat-exchanger fins. On a machine running two shifts, filters load up in four to six weeks. A clogged filter raises the internal temperature, and drives start throwing overtemperature faults in summer. Replace the filter element, do not wash and reuse it.
After everything is dry, lubricate. Way oil goes on the guideways and ball screws through the automatic lube system, and you should manually pump or cycle the lube unit once to confirm it is delivering. Grease the appropriate zerks on the spindle chiller lines and the tool changer arm per the manual interval. Do not grease a sealed linear guide block.
Finish by checking the automatic lubrication reservoir level and the air line filter-regulator-lubricator bowl. Drain water from the air filter. Moisture in the air line is the most common cause of a sticky tool changer and erratic clamp behavior.
Where cleaning goes wrong
The most expensive mistake is air on the taper. A 2 bar nozzle sends a chip stream straight into the spindle seat. The next tool runs with runout you cannot feel by hand, and the first sign is a wall thickness out of tolerance on a batch of 200 parts.
The second is water on electronics. A damp rag on the outside of a cabinet is fine. A wet wipe inside, near a drive or a terminal strip, causes intermittent faults that take days to trace. If you see moisture inside a cabinet, stop and find the source before you power up.
The third is cleaning without lubricating. A wiped guideway with no oil film rusts overnight in a humid shop. Way oil is not optional after a clean. Pump the lube system and confirm oil reaches the far end of the longest axis.
The fourth is mixing coolants. Adding brand A concentrate to a sump of brand B breaks the emulsion and drops lubricity. Stick to one product. If you must switch, dump, flush, and recharge.
For shops running tight work, cleaning is part of holding ±0.005 mm. A dirty machine drifts. The thermal and mechanical errors from chips under a fixture or in a taper are larger than the tolerance band on most of the parts we quote.
Step by step
Run these in order. Skipping ahead means re-cleaning what you already finished.
- 1Lock out and let the spindle coolCycle stop, home all axes, main breaker off, lockout tag on. Wait 20–30 minutes so the spindle nose is below 35 °C before you wipe it.
- 2Clear the table and T-slotsRemove fixtures. Chip hook first, then a nylon brush, then vacuum. Keep compressed air below 2 bar and away from the taper.
- 3Wipe the enclosure and way coversUse coolant or a mild water-based cleaner on lint-free wipes. Do not lift way covers; wipe the top surface and let the telescopic sections drain.
- 4Clean the spindle taperLint-free wipe on a plastic stick, working from the small end outward. Acetone only, then let it flash off. Inspect for fretting under a light.
- 5Clean tool holders and the ATCWipe each taper and check the retention knob. Brush chips out of the tool changer pockets. A chip in a pocket causes a mis-clamp and a dropped tool.
- 6Empty the chip conveyor and clean the tankRun the conveyor out, scrape fines from the settling area, skim tramp oil. Check coolant concentration at 6–10% and pH at 8.5–9.5.
- 7Service filters and cabinet coolingClean or replace bag filters, cyclone media, and cabinet fan filters. Vacuum the cabinet interior dry. Never blow air inside the cabinet.
- 8Lubricate and verifyCycle the auto lube unit, grease the manual points, drain the air filter bowl. Run a warm-up cycle and check axis motion before loading a job.
Cleaning interval by task
Intervals assume a two-shift shop cutting aluminum and steel with water-miscible coolant.
| Task | Interval | Method | Watch out for |
|---|---|---|---|
| Table and T-slot debris | End of every shift | Chip hook, nylon brush, vacuum | Wire brushes remove the ground finish |
| Spindle taper wipe | Every tool change or daily | Lint-free wipe, acetone | Never blow air at the taper |
| Coolant concentration and pH | Weekly | Refractometer, pH strip | 6–10% concentration, pH 8.5–9.5 |
| Chip conveyor and settling area | Weekly | Run out, scrape fines | Fines starve the pump inlet |
| Tramp oil skimming | Daily, one hour | Belt skimmer | Do not top up a soured sump |
| Cabinet fan filters | Every 4–6 weeks | Replace element | Washing and reusing cuts airflow |
| Way lube and grease points | Per manual, at cleaning | Auto lube cycle plus manual | No grease on sealed guide blocks |
| Full coolant change | 3–6 months or on odor | Dump, clean tank, recharge | Partial top-ups do not fix bacteria |
Common questions
How often should I clean my CNC machine?
Table debris and the spindle taper get attention every shift. Coolant checks, chip conveyor, and tramp oil skimming are weekly. Cabinet filters run four to six weeks.
A full coolant change depends on the sump. Three to six months is typical, or sooner if the fluid smells sour or the pH drops below 8.5.
Can I use any cleaning solution on a CNC machine?
No. Mild water-based cleaners and the machine's own coolant are safe on painted surfaces and cast iron. Acetone is for the taper only, and it must flash off before a holder goes in.
Avoid chlorinated solvents, strong caustics, and anything that leaves an oily film on the taper. Never spray aerosol cleaner into a control cabinet.
What happens if I do not clean regularly?
Chips pack under fixtures and in T-slots, so your zero shifts and parts drift. Coolant goes rancid, loses lubricity, and starts rusting the table.
Long term, fines and tramp oil wear the pump and plug filters. Guideways run dry and the machine loses accuracy before it fails outright.
Do GreatLight machines get cleaned on a schedule?
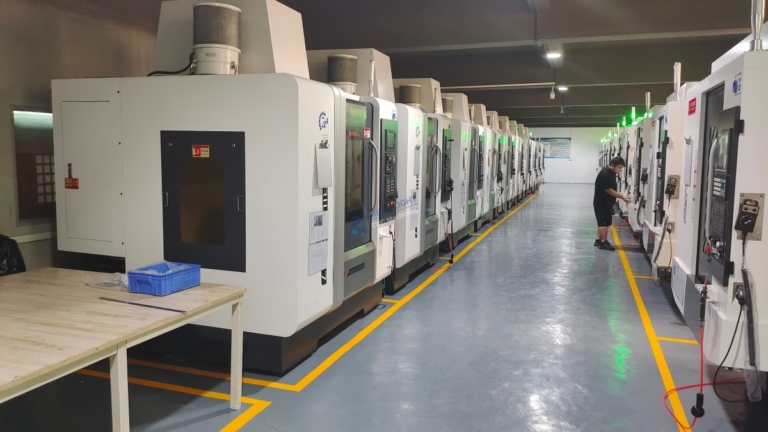
Yes. Our 127 high-precision CNC machines, including 16 simultaneous 5-axis machining centers, run on a documented daily, weekly, and monthly maintenance schedule.
Cleaning and lubrication records sit with the machine. That is part of how we hold ±0.005 mm and a 99.99% qualification rate across production runs.
How does machine cleaning affect part quality on custom orders?
Debris in a taper or under a fixture shows up as runout, height error, or a surface finish that misses the print. For a part held to ±0.005 mm, a 0.005 mm chip is the whole tolerance band.
Clean coolant also means fewer inclusions and stains on the finished surface, which matters on medical and aerospace work.
Does GreatLight offer maintenance guidance for clients running their own machines?
We share our procedures and inspection practice with customers when it helps them run our parts better. Talk to an engineer about your machine type and coolant.
For customers without in-house capacity, we machine and finish the parts here under ISO 9001:2015, IATF 16949:2016, ISO 13485:2016, and ISO 27001:2022 controls.
Send us the drawing
Upload your CAD files and we come back with a quote and a free DFM analysis within 12 hours. Uploads are secure and confidential, and an NDA is available on request.
12-hour quoteNo minimum order quantity100% inspection before shipment
More from the shop floor
We publish setup notes, tooling trials and inspection data from the factory floor.











