

Mastering the integration of design and manufacturing is a critical challenge in modern precision engineering. For professionals and clients in the precision parts machining and customization field, understanding how to control a CNC machine using Fusion 360 is more than a software tutorial—it’s a gateway to unprecedented efficiency, accuracy, and seamless transition from digital concept to physical part. This powerful CAD/CAM (Computer-Aided Design and Manufacturing) platform consolidates the entire workflow, and when paired with a capable manufacturing partner like GreatLight Metal, it becomes a formidable tool for innovation.
This guide delves into the professional workflow, best practices, and the tangible benefits this integration brings to custom part production.
H2: The Fusion 360 to CNC Workflow: A Step-by-Step Breakdown
The process from a blank idea to a finished machined component involves a structured digital thread. Here’s how Fusion 360 serves as the central nervous system.
H3: Phase 1: Design & Engineering Validation
Before any code is generated, the part must be impeccably designed.
Create or Import the 3D Model: Start by designing your part directly within Fusion 360’s parametric modeling environment or import industry-standard files (STEP, IGES, SLDPRT). This is where your concept takes digital shape.
Define Critical Features & Tolerances: Annotate your model with GD&T (Geometric Dimensioning and Tolerancing) symbols, surface finish callouts, and critical dimensions. This digital drawing becomes the single source of truth for the machinist and quality inspector.
Material & Stock Setup: Define the virtual block of material (the “stock”) from which your part will be cut. Accurate stock definition is crucial for collision avoidance and efficient material usage.
H3: Phase 2: CAM Programming – The Heart of Control
This is where you digitally command the CNC machine’s movements.
Setup Configuration: Create a new “Setup.” Here, you tell Fusion 360:
Which CNC machine you are targeting (e.g., a 3-axis, 4-axis, or a high-precision 5-axis CNC machining center). Selecting the correct machine kernel (post-processor) is vital.
The orientation of your stock on the machine table.
The work coordinate system (WCS), which defines the part’s zero point (X0, Y0, Z0) for the machine.
Toolpath Strategy Selection: Fusion 360 offers a vast library of strategies. Choosing the right one is an art:
Roughing: (Adaptive Clearing, Pocket) to quickly remove bulk material.
Finishing: (Parallel, Contour, Scallop) to achieve final dimensions and surface finish.
Specialized Operations: (Drilling, Thread Milling, 3D Adaptive) for specific features.
Tool & Parameter Definition: Select tools from an extensive library or create custom ones, defining diameter, flute count, length, and coating. Then, set precise cutting parameters: spindle speed (RPM), feed rate (IPM), and depth of cut. This is where machining expertise directly impacts tool life, surface finish, and cycle time.
Simulation & Verification: Before generating a single line of code, use Fusion 360’s built-in simulator. Watch a virtual representation of the tool removing material. This step is non-negotiable for:
Collision Detection: Preventing catastrophic machine crashes.
Verify Stock Removal: Ensuring the final part matches the design.
Cycle Time Estimation: Accurately predicting machining duration for cost analysis.
H3: Phase 3: Post-Processing – Speaking the Machine’s Language
The toolpaths you’ve created are platform-agnostic. A “post-processor” translates them into specific G-code that your particular brand and model of CNC machine can understand.

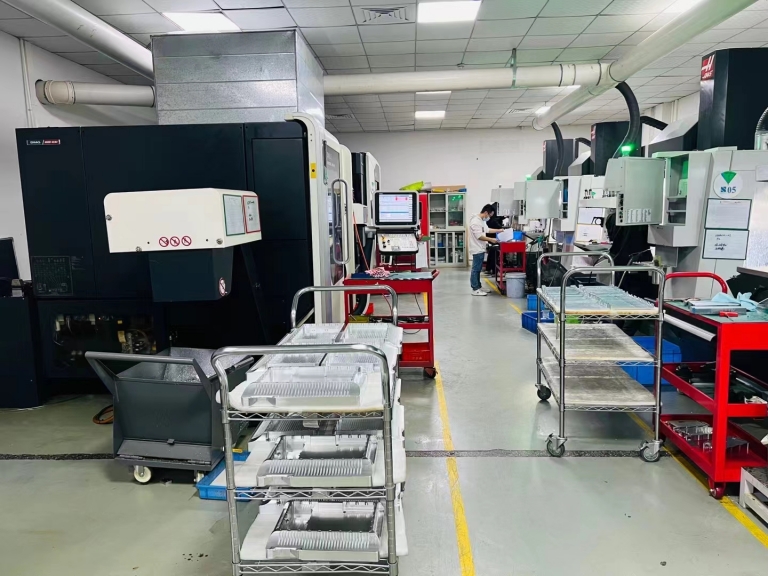
Select the Correct Post-Processor: This is a crucial file that maps Fusion 360’s generic movements to your machine’s specific syntax (e.g., Fanuc, Heidenhain, Siemens, Haas). GreatLight Metal, for instance, maintains optimized post-processors for their fleet of Dema, Jingdiao, and other advanced CNC centers to ensure flawless code execution.
Generate the CNC Program: With the click of a button, Fusion 360 outputs the .NC or .GCODE file. This file contains every move, speed change, and tool change command.
H3: Phase 4: Machine Control & Execution
This is the moment of truth, where the digital meets the physical.
Transfer the Program: Send the G-code file to the CNC machine controller via network, USB, or DNC.
Machine Setup: The machinist physically secures the raw material, loads the required tools into the machine’s magazine, and sets the work offsets as defined in the Fusion 360 setup.
Prove-Out: A responsible practice, often involving a “dry run” (machine running without material) or machining a first article in cheaper material (like wax or plastic), is conducted to finalize the process.
Production Run: The machine executes the program autonomously, monitored by skilled technicians.
H2: Why This Integration is a Game-Changer for Custom Machining
Moving from disparate software systems to an integrated Fusion 360 workflow offers tangible, bottom-line benefits for anyone sourcing custom precision parts.
Unmatched Design-to-Manufacturing Continuity: Changes made to the 3D model automatically cascade to the CAM toolpaths, eliminating manual updates and the risk of working from outdated revisions. This is critical for iterative design common in R&D.
Enhanced Collaboration with Your Manufacturer: You can share the entire Fusion 360 design file (.f3d or .f3z) with your machining partner. This provides infinitely more context than a 2D drawing alone, enabling them to suggest Design for Manufacturability (DFM) improvements early, optimize the machining strategy, and provide more accurate quotes. A partner like GreatLight Metal leverages this data to pre-plan the most efficient process across their full chain of CNC, EDM, and finishing services.
Predictability and Risk Reduction: Advanced simulation catches errors in the digital realm, where they are cheap to fix, rather than on the shop floor, where a crash can cost thousands in damaged tools, components, and machine downtime.
Access to Advanced Strategies: Fusion 360 gives you or your supplier access to modern, high-efficiency toolpath strategies like Adaptive Clearing, which reduces tool load and allows for deeper, faster cuts, ultimately shortening lead times.
H2: Choosing the Right Manufacturing Partner for Your Fusion 360 Workflow
The sophistication of your software toolchain must be matched by the capability of your manufacturing partner. The most elegant Fusion 360 program is only as good as the machine and team that execute it.
When evaluating a partner for precision 5-axis CNC machining services, consider their ability to be a true extension of your engineering team:
Post-Processor Expertise: They should have proven, reliable post-processors for their specific machines to ensure your G-code runs flawlessly.
High-Level Machine Tooling: The promise of Fusion 360’s complex multi-axis toolpaths can only be realized on stable, high-precision equipment. Partners with modern 5-axis CNC machining centers can unlock geometries impossible on 3-axis machines.
Full-Process Understanding: The best partners don’t just execute code; they review it with an engineer’s eye. They can suggest tweaks to feeds/speeds for their specific tooling, recommend alternative strategies for better surface finish, or identify opportunities to consolidate setups, saving you time and money.
Systemic Quality Assurance: A partner’s certifications, like the ISO 9001:2015 and IATF 16949 standards upheld by GreatLight Metal, are not just plaques on the wall. They represent a systemic commitment to process control, measurement, and traceability that ensures every part produced from your Fusion 360 file meets the specified tolerances, batch after batch.
Conclusion
Learning how to control a CNC machine using Fusion 360 empowers you to compress the product development timeline, enhance part quality, and foster a more collaborative relationship with your manufacturing supplier. It transforms you from a passive design submitter to an active participant in the manufacturing process. The ultimate key to success lies in pairing this powerful digital capability with a manufacturing partner that possesses the technical depth, advanced equipment, and quality-driven culture to bring your most complex digital designs to life with reliability and precision. This synergy between sophisticated software and expert execution is what turns ambitious concepts into tangible, high-performance components.
Frequently Asked Questions (FAQ)
Q1: Can I use Fusion 360 to program any brand of CNC machine?
A: Essentially, yes. The critical component is the “post-processor,” a translator that converts Fusion 360’s generic toolpaths into the specific G-code dialect of your machine (e.g., Fanuc, Siemens, Haas). Fusion 360 has a library of standard posts, and most reputable machine manufacturers or CAM communities provide custom ones. A professional machine shop will have dedicated, optimized posts for all their equipment.
Q2: Is Fusion 360 suitable for programming complex multi-axis (4-axis or 5-axis) machining?
A: Absolutely. Fusion 360’s CAM module includes robust multi-axis strategies for simultaneous 4-axis and 5-axis machining, swarf machining, and tool orientation control. This makes it an excellent, more accessible-cost option for programming complex aerospace, medical, or automotive components that require contouring on multiple faces without repositioning.
Q3: I’m a designer, not a machinist. How deep do I need to get into CAM settings?
A: You can engage at multiple levels. At a minimum, creating a clean, well-defined 3D model with clear tolerances is 80% of the battle. You can then hand off the model to your manufacturing partner’s CAM engineers (like those at GreatLight Metal) who are experts in selecting tools, strategies, and parameters. As you learn, you can take on more CAM programming yourself to convey your intent more precisely.
Q4: What are the most common mistakes when first using Fusion 360 for CNC?
A: Key pitfalls include:
Incorrect Stock Setup: Leading to tool crashes at the machine limits.
Wrong Post-Processor Selection: Generating code the machine cannot read.
Skipping Simulation: Failing to catch rapid moves through the part or holder collisions.
Unrealistic Cutting Parameters: Using feeds/speeds that break tools or produce poor finishes.
Neglecting Tool Length and Holder Definitions in Simulation: This can miss collisions that only happen with the actual tool assembly.
Q5: How does this workflow integrate with a manufacturer’s other services, like 3D printing or finishing?
A: An integrated manufacturer uses your Fusion 360 model as the master data source for all processes. For example, a complex part might be 3D printed (SLM) as a near-net-shape preform, then precision finished on a 5-axis CNC machine—all referenced to the same digital model. The model also informs surface treatment specifications (anodizing, plating) called out in the design. A partner offering a full-process chain ensures seamless transition between these stages under one quality system. For industry insights and further networking, you can connect with professionals on platforms like LinkedIn.



















