From Dreams to Chips: A Journey to Building a DIY CNC Mill
The whistling sound of spindle cutting materials, the precise dance of motors, the precise dance of moving tool paths, the satisfaction of creating something obvious from digital design – possessing CNC mills unlocks incredible potential. Despite the significant investment in professional machines, the DIY route offers an attractive option: affordability, deep customization and unparalleled learning and satisfaction. If you are a manufacturer, amateur, technician or engineer who is passionate about creation, then building your own CNC mill will be a very meaningful project. Let’s dive into the world of DIY CNC machining.
Why build your own CNC mill?
Motives are as diverse as builders themselves:
- Cost savings: Compared with commercial machines, the initial investment has been significantly reduced.
- Custom: Build exactly what you need – custom work envelopes, spindle power, materials (wood, plastic, soft metal), precision levels and software integration into your specific project.
- Educational Value: Get in-depth, hands-on knowledge about mechanics, electronics, motion control (prairie/server), kinematics and CAM/CAD software – transferable to many fields.
- Pride and Achievement: Great satisfaction in your conception, construction and operation of complex machine tools that are lifelike.
- Accessibility: Turn on the precision manufacturing feature in your home store or garage.
Core components of DIY CNC mill
Building a CNC mill involves integrating several key subsystems:
Frame and structure ("bone"): The foundation determines rigidity, stability and ultimately achievable accuracy and the material you can cut.
- Material Options:
- Steel extrusion (e.g. 80/20 T-Slot): Easy to get assembly and modular, acceptable rigid/medium responsibilities.
- Steel plate/manufacturing frame: Provides excellent rigidity for heavier cutting, but requires welding or important machining skills.
- Aluminum plate: Easier to use than steel, but less rigid; best for smaller machines or lighter tailoring.
- Wood (e.g. plywood/MDF): Budget-friendly entry point, but lacks rigidity and stability, and is only suitable for very lightweight hobby jobs (such as PCB milling).
- Design notes: Minimize deflection! Over-building is usually better ground floor buildings. Consider the required distance to travel the axis for your project.
- Material Options:
Linear motion ("sports"): How the shaft slides smoothly.
- Rails and Bearings: Circular rails (cheaper, suitable for light loads), profile/linear rails (high quality stiffness, accuracy and load capacity). Paired ball bearings ride on these tracks.
- Lead screws/ball screws/belts:
- Lead screws: Affordable rebound potential (slope) suitable for slower/reduced accuracy requirements.
- Ball screws: Minimum rebound, higher efficiency and speed potential, requires precise installation and is best suited for precise work. It is crucial for high-quality mills.
- belt: Very high speed/low noise, but stretch limits accuracy and force transmission; rare for Z-axis and sometimes used for X/Y in routers.
Drive system ("muscle"): Convert electrical signals to physical motion.
- Stepper motor: Common at low speeds, affordable, good torque, but can lose steps under too much load or incorrect tuning.
- Servo motor: Higher cost, higher speed/torque range (especially at speed), provides feedback for closed-loop control (accurately knowing the location), recovering from the booth. Ideal for high-performance builds.
- Motor/Controller: Electronic board that explains the steps/direction signals of the control software and transmits the necessary power to the motor. Quality drivers are essential for smooth operation and preventing motion stalling.
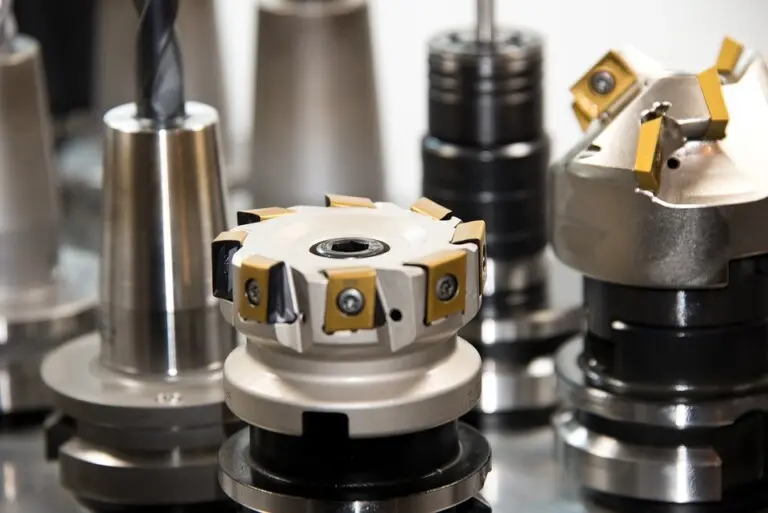
Spindle ("Cutting knife"): The rotary tool that performs the cutting.
- Router spindle (wire brushed/brushless): DIY is common. High RPM (>10K -24K rpm range), suitable for wood, plastic. Variable speed (VFD of AC spindles) is crucial.
- DC/step motion spindle: Lower cost, lower RPM and power, only for very soft materials or engravings.
- Yes collets: Standard Chuck system safety handle for fixing cutting tools.
- Controller ("brain"): Electronic management everything.
- Motion control board (e.g., an Arduino with GRBL shield, a Raspberry Pi running LinuxCNC/MachineKit, dedicated controllers like the Gecko G540): Receive G-code instructions from the computer and generate a step/direction signal sent to the motor driver.
- power supply: Provides clean power to controllers, motors, drivers and spindles.
- Control software (e.g., general G-code sender, MACH3/MACH4, LinuxCNC): Run on a PC, interface with the motion controller, and provide a user interface (send G-code).
- CAD/CAM software: Separate software design Parts (CAD-Fusion 360, freecad, Onshape) and generate Toolpath/G code (CAM-integrated in CAD or standalone Cambam, meshcam).
Build process: Key steps
- Blueprints and research: Don’t jump in! Define requirements (dimensional, material, accuracy, budget). Research design is extensive (OpenBuilds, CNCzone Forum, YouTube). Choose Kinematics (Mobile Gantry and Mobile Table). Model your design in CAD.
- Procurement components: Compile a detailed BOM (Bill of Materials). Purchase the core components of quality (rails, screws, motors, drives). Factors of transportation, import fees and tools.
- manufacture: Accuracy is key. Cutting frame composition is accurate. Carefully drill and knock holes. Manufacture motor brackets and bearing blocks to ensure perpendicularity and alignment. Here, you can use the machine tool help (contradictory!). The rig, band saw and square are the minimum values.
- assembly: Follow your plan. Gradually assemble the frame and constantly check the Querments and Arignment (the dial indicator is priceless). Carefully install the linear motion assembly (rail). Install the axle cabin and then install lead/ball screws or belts. Connect the stepper/servo motor.
- wiring: Tidy and organized connections. Secure the cable away from the moving parts. Connect the driver to the motion controller and the motor. Connect spindle/controller/VFD. Integrated limit switches (strongly recommended for safety and homing). Connect to the power supply. Double check polarity!
- Software Settings and Configuration: Install and configure control software (MACH3, UGS, LinuxCNC). Strictly configure the firmware parameters of the motion controller (steps per axis/mm, maximum speed, acceleration). Calibrate step/mm using dial indicator or physical measurement tool.
- First action and adjustment: Test each axis independently. Move to limit (switch settings). Adjust motor acceleration and speed settings to prevent stalling. Test combination (diagonal). Introduce simple air cutting (no material). Practice destination. Back up your configuration!
- Safety finalization: Install the necessary guards (especially the spindle), workers (vills, fixtures). Fire extinguishers nearby. Wear PPE (safety glasses, hearing protection, and avoid loose clothes). Ensure that electronic parking circuits are dysfunctional and accessible. Safety cannot be an afterthought!
Challenge: Be prepared
- Time Commitment: This is no Weekend project; it takes months of dedication.
- Accurate is important: The base frame/convenience in the end machine will magnify. Patience and precise measurement tools are not negotiable.
- "Let’s save money" trap: Careful counting is crucial. this "I just upgraded x…" Mindset often leads to cost spread. factor all Consumable tools, wiring, connectors, fasteners, lubricants.
- Rigidity vs. Cost/Complexity Trade-off: Achieve high stiffness for processing metals pushes complexity and cost to commercial solutions.
- Electronic complexity: It is crucial to understand motor adjustments, limit switch wiring, grounding and noise suppression. Welding and wiring skills are crucial.
- Software Learning Curve: Proficiency in CAD, CAM and control software is a major effort.
- Calibration and adjustment: Expect to take a lot of time for fine-tuning steps/mm, acceleration, reverse pay and spindle jump.
- Security risks: High-speed rotating tools pose a major hazard. Strict security practices are mandatory.
DIY and professional services: Find the right one
Building a DIY Mill is a wonderful journey of learning and creation, but it has boundaries:
- limit: DIY Mills strives to deal with extreme rigidity requirements, high pressure operation, very high spindle speeds under load, and microscopic level accuracy required for aerospace or medical parts. Working hardened steel or repetitive production of highly resistant parts is challenging.
- Professional CNC machining shines when: For production runs, demanding materials (titanium, hardened steel) require advanced multi-axis strategies (especially 5-axis machining simultaneously), complex geometry, extremely precise tolerances (microns) (microns), strict quality control, surface finish requirements or tight deadlines, like professional services, Greglight Gragenting It is the best solution.
Conclusion: The meaningful path to creation
Building a DIY CNC mill is more than just a construction machine. It’s a profound journey to build skills, knowledge, patience and resilience. The feeling of cutting the first part on a machine built from scratch is unparalleled. It opens up a creative and prototype possibilities in your workshops.
Understand the big commitment of time, energy and careful procurement. Think of challenges as learning opportunities. Priority is given to security. Your DIY mill will be a unique tool that reflects your creativity.
However, please identify that your project needs more than the DIY settings feature. Trust experts is key for complex geometric shapes that require true 5-axis accuracy, challenging materials that require high rigidity and power, or production runs that require top quality and reliability.
Greglight Gragenting Be ready as your high-precision manufacturing partner. With advanced 5-axis CNC capabilities, expertise in a variety of materials (metals, engineering plastics), strict quality control, and comprehensive post-processing services (anodizing, plating, painting, assembly), we transform complex designs into functional reality. We focus on effectively solving complex metal parts manufacturing challenges. If your vision requires uncompromising precision, speed and professional execution, Greatlight offers it. [Contact GreatLight Machining today] Discuss your specific precision parts requirements and experience the differences in professional manufacturing.
DIY CNC Mill FAQ
Question 1: How much does it cost to build a DIY CNC mill?
Answer: Costs vary greatly based on scale, stiffness target, accuracy target and component selection.
- Very basic (wooden frame, small): $500- $1,500 (for cork, plastic, PCB).
- Medium distance (steel extrusion/plate, capable of light aluminum): $1,500-$4,000.
- High rigidity (manufactured by steel, high-quality tracks/screws/servers, capable of stabilizing metal work): $4,000- $10,000+.
- Key Tips: Budget at least an additional 20-30% "additional" Such as tools, labor, measurement tools, cables and modifications.
Q2: What materials can be used for a typical DIY CNC mill?
one:
- easy: Woods, MDF, acrylic, PVC, engraved composites, circuit boards.
- Note (depending on the build): Soft aluminum alloy (6061 is common), brass, some soft bronze, Delrin/acetal, HDPE, nylon.
- Very difficult/not recommended: Steel (especially hardened), titanium, stainless steel (need to be buildings with unusually rigid, high power near commercial levels). Feasibility depends entirely on the machine’s stiffness and spindle power.
Q3: What software do I need?
one:
- CAD (Design) Examples: Fusion 360 (free amateurs), Freecad (open source), Onshape (Cloud).
- Cam (Tool Route Generation) Example: Fusion 360 (cam built-in), Cambam, Green Camera, Estlcam. Freecad Path Workbench.
- control("CNC console") Examples: General G code sender (PC-based GRBL control), MACH3/MACH4 (fossil/Windows), LinuxCNC (Linux OS environment). For Raspberry Pi: MachineKit, BCNC.
- Slicer (for 3D conversion): It is only required if the STL model is converted directly into a tool path (e.g. Fusion 360 CAM, Meshcam).
Question 4: How difficult is electronic wiring?
A: It involves the complexity in the middle. You need:
- A basic understanding of circuits, polarity and connections.
- Soldering skills of connectors/terminals are often essential.
- Be able to carefully follow the wiring diagram.
- Conceptually, the stepper/driver/motion controller signal flow (pulse/direction) works.
- Careful attention to the electric adjustments (current limits, microfills) in the firmware settings is critical for smooth operation.
Q5: How much precision can I expect?
A: It can measure thousands of inches (MILS or "you") or mm (mm).
- Important focus of entry-level wood: +/- 0.010" Or more may be acceptable.
- Sturdy mid-range metal capability machine: After careful calibration and adjustment, +/- 0.002 can usually be achieved" -0.005" (.05mm-.13mm) is feasible.
- Factors that affect accuracy: Overall stiffness, rebound in screws/belts/bearings, electric adjustments, spindle jumps, calibration accuracy, thermal effects, settings/workers, tool clarity.
Question 6: Can I build a real 5-axis DIY CNC mill?
A: Although technically doing 5-axis DIY builds are:
- Extremely complex: An in-depth understanding of complex kinematics and simultaneous interpolation encoding is required.
- Mechanical Challenge: All moving parts require a very robust and rigid structure.
- Very expensive: High precision dual rotation shafts and more powerful controller/driver expensive.
- Software Challenge: The 5-axis cam is complex and resource-intensive; the control software must support it strongly. For serious 5-axis applications, professional services, etc. Greglight Gragenting It is usually a more practical and reliable solution.
Question 7: Why choose Greatlime for professional CNC jobs instead of using my DIY mill?
one: Greglight Gragenting Bringing basic advantages to demanding applications:
- Advanced 5-axis functions: For complex geometric shapes that require simultaneous multi-axis movement and impossible setups are made on a simple 3-axis machine.
- High power production-grade equipment: Handle hard materials (stainless steel, TI, hardened steel) at higher speeds and feeds.
- Micron-scale accuracy and tight tolerances: Due to machine stability, metrology tools and process control are excellent, it can be achieved consistently.
- Material expertise and certification: Knowledge and certification for precise treatment of a wide range of alloys and plastics.
- Strong quality assurance: Strict inspection protocols and documentation ensure that parts meet specifications.
- Scalability and speed: Effectively handle larger production volumes and achieve stricter deadlines through multiple production machines.
- Completed: Seamless post-treatment (anodization, plating, painting, heat treatment) is all under one roof. If your project requires uncompromising quality, speed, or involves complex materials/geometry, then choosing Greatlight’s expertise ensures success.


