As with any manufacturing process,3D printing also has advantages and disadvantages, as well as limitations. Indeed, we often encounter problems and obstacles when we want to create more or less complex parts and structures. For example, we think of excessive compression, deformation or bellbottoms. This time we want to tell you about blisters or stains that can appear on 3D printed parts. These are small dots or droplets of filament visible on the surface of parts produced using FDM/FFF printing technology. They usually appear as the extruder begins to remove material and returns after printing. Over time, this bond will become visible as spots on the surface of the part.
There are many reasons why these small bubbles appear during FDM 3D printing, such as shrinkage. When retracting, a small amount of filament is drawn back into the nozzle to prevent any problems with the filament later. However, these defects can occur if the filament retracts too little or too much, or if it retracts too slowly or too frequently. The temperature and speed of the nozzle also favor the formation of bubbles. Too high temperatures will increase the viscosity of the material and may cause large numbers of filaments to exit the nozzle uncontrollably. A print speed that is too high or changes frequently can also cause surface quality to deteriorate. Finally, insufficient cooling of the different layers of material can also be responsible for these defects, as the material can slip, causing irregularities. Now that we know the cause, let’s look at possible solutions to the problem.

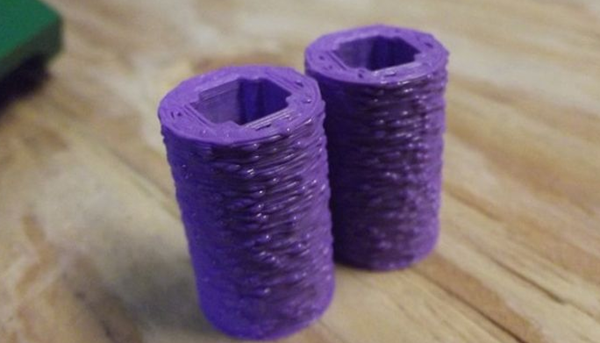
bubbles and spots inSmall droplets appear as filaments on the surface of a 3D printed part (Photo: Chris Cecil)
Calibrating the extruder to reduce foaming
As mentioned above, poor extrusion can cause blistering. This is why you must first properly calibrate your extruder. This can be done usingE-Step Calibration is a 3D printer firmware setting that determines how many steps the extruder needs to extrude one millimeter of filament. If the calibration is correct, the desired length of filament will be extruded. If this is not the case or the filament width is not within specifications, adjusting the flow rate may be a way to resolve the issue. This setting controls the amount of filament extruded and prevents too much material from being ejected from the nozzle, causing drag. Also make sure the 3D printer nozzle is clean and unobstructed, as this could cause insufficient and uneven extrusion, leading to defects on the surface of the part.
Retraction adjustment
The retraction setting allows the filament to be retracted from the extruder end. This helps prevent material from accidentally spilling due to pressure buildup in the nozzle. Retraction is a useful feature that helps prevent stringing. However, incorrectly adjusted retraction speed, distance and frequency can lead to blistering.
The retraction speed determines how quickly the filament is retracted and then reinserted into the hot end. If the speed is too slow, the filament cannot be removed from the nozzle in time and the material will fall, causing bubbles. To avoid this, increase the retraction speed by approx.25%. Another retraction setting that can prevent these spots from forming is the retraction distance, which controls how far the filament retracts with each retraction. If this distance is too great, a gap will appear between the nozzle and the filament, allowing air to enter the nozzle and causing bubbles to appear on the part. Conversely, if the gap is too small, not enough filament is retracted and excess material may be ejected from the nozzle, which can also cause irregularities. To find the best retraction setting, first slowly and gradually increase the retraction distance.
Finally, if you still notice bubbles, try gradually shortening the distance until you find your ideal fit and there are no visible imperfections. Finally, avoiding withdrawals themselves or at least reducing the frequency of withdrawals can also help. To do this, activate or increase the minimum retraction distance on the slicer. Minimum retraction distance is the minimum distance the nozzle can travel before it can retract. This will reduce the frequency of retraction, thereby reducing the occurrence of blisters.

Photo credit:Bee 3D printer
Reduce temperature and speed
If the printing temperature is too high, the viscosity of the material will increase, making it too thin and potentially uncontrollable. Try lowering the temperature first5-10°C, please keep in mind that recommended printing temperatures may vary depending on filament. ABS should be printed at a higher temperature (230 to 260°C), while PETG should be printed at a temperature between 210 and 250°C, and PLA should be printed at a lower temperature (between 190 and 220°C). Also make sure the print speed is not too high as this could affect the quality and accuracy of the part. In fact, the different layers of material do not have time to settle completely, which makes the surface uneven and irregular. First reduce the speed to between 5-10mm/s and gradually find the best printing value.
In addition to lowering the temperature and printing speed, you can also increase the ventilation or cooling of your printer to prevent bubbles. Also withIncrease the microtome fan speed in 10% increments until you see a reduction in staining.
Enable inertial navigation to reduce light bulbs
Some slicers (eg.Cura, PrusaSlicer or Simplify3D) has an inertia function to avoid bubbles. As we mentioned, there is pressure at the end of the extruder that causes the filament to flow through the nozzle even if it stops moving. If this happens, the Glide feature can help. This setting predicts the pressure in the hot end and stops the material flow just before the end of the print to prevent bubbles from forming. Simply activate the freewheel function in your cutting software.
Daguang focuses on providing solutions such as precision CNC machining services (3-axis, 4-axis, 5-axis machining), CNC milling, 3D printing and rapid prototyping services.


