Have you noticed that the top layer of your print is uneven, rough and porous? This visible unwanted defect is called a pillow defect and only appears at the end of the print.
This is mainly due to poor cooling of the upper layer. If they don’t cool well, the layers can wrap around the underlying filling structure, creating a cushion pattern.
Wrinkling is a process related to molten deposit modeling(FDM) errors related to printer printing. Due to the way FDM works (one layer is printed on top of another), there are many reasons why cushioning can occur. The main reasons include different infill densities and patterns before the top layer, as well as improper cooling and problems with filament solidification.
In this article, we’ll take a closer look at what causes the pillow effect, then discuss ways to avoid it, and finish with some tips and tricks to remember.
A,when does this happen

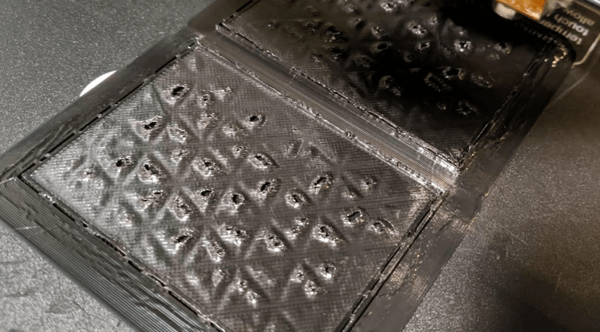
Understanding how to prevent and resolve pillow problems requires understanding their causes (source:ctb5009, via Reddit)
all consumables and everythingCushioning can occur with any FDM printer, but some materials or settings are more sensitive than others. Overall, the root cause of the pillow effect is a lack of grid strength on the top layer. Raster refers to filaments extruded in a single printing direction. Therefore, the key to troubleshooting is discovering where the weak points in the network are. There are three broad categories of reasons to check: materials, microtome settings, and hardware issues.
1、Material
In terms of materials, softer filaments are more sensitive due to their inherent flexibility. When this type of material is extruded and laid on top of another layer, its drooping characteristics tend to cause each grid to sink downward without an infill pattern to support it. In these areas, a sort of bridge printing occurs and if the grid does not solidify quickly, its own weight will distort it.
To strengthen extruded filaments in these situations, it is important to always set the correct temperature and cooling rate for the flexible material. Although flexible materials are more likely to experience the pillow effect, other types of materials are not immune. If there is not enough cooling and the material is too hot, it is more likely tosag, do not flow properly and prevent the material from achieving adequate rigidity. Establishing the proper extrusion temperature for each material and its cooling rate is key to avoiding this, which we’ll take a closer look at below.
2、Slicer Settings

The filling pattern can be seen as the top layer goes through the pillow (Source:m-gregoire via Reddit)
Given the slicer configuration, as mentioned before, the top raster will be dropped on top of and supported by the fill. Unless you select a cosmetic effect designed to show the print infill, the top layer will bePrint at 100% infill density, just to surround the model. The less dense the infill underneath, the more it will resemble a bridge print, and this type of open space print requires specific conditions to be successful.
However, if total weight and print time are not critical project parameters, a simple way to overcome this problem is to increase the infill density and change the infill pattern to a more closed pattern. This isn’t always possible, especially if you’re working with larger models, more expensive materials, or have a deadline. We’ll look at more solutions below.

A thin top layer may not be enough (source:Protobot via Reddit)
Another cause of the pillow effect could be insufficient thickness at the top. With less hardware, you not only face the problems mentioned previously“transition” risks and there may also be transparency issues that compromiseThe aesthetics of your prints. Pillowing is more likely to occur if your top layer is only one layer (i.e. one layer or one piece), as shown in the photo above.
3、material
Finally, if the printer is experiencing hardware issues, underextrusion may be a problem. Undercrushing and reinforcement are different phenomena with different causes, however, both produce a surface with gaps and a lack of material. While the first case can occur throughout the printing process, the second only occurs when the top layer is printed. If the extrusion head is underextruded, this means that there is not enough filament deposited, thus weakening each grid. If you notice a lack of compression, you may also be experiencing pillow issues.
two,Fix

Increasing the number of layers or the height of the layers is a good first step to solving pillow problems (source:chimchim11 via Reddit)
Understanding the root cause of your pillow is only the first step to overcoming it. The next step is how to deal with it. As with most printing problems, there are several ways to resolve this issue. Considering the material properties, slicer settings, and hardware issues mentioned previously, a combination of the following methods is the best way to resolve the issue.
1、Increase the height of the floor and the top floor
As mentioned earlier, this can become a problem when the top surface is not thick enough, as this can weaken the top layer. Fortunately, this problem is easily solved by simply increasing the thickness of the slicer top.
Top thickness affects the number of top layers and the height of each layer. Consider increasing the number of floors above six. existIn UltiMaker Cura, you can find it under “Top/Bottom > Top” in the Print Setup menu.
Although more material is added, increasing the height of the floor will increase the cross-sectional area of each grid, thereby increasing their strength. When the height of the print layer is small, the filament is more likely to deform.Printers using 1.75mm filaments are more likely to suffer from cushioning than printers using 2.85mm filaments. This setting is found in the Print Settings menu under Quality > Layer Height.
Another possibility is to increase the layer height used for the infill section by six, e.g.0.2mm increased to 1.8mm; this should be enough to mask any pillow effect occurring. Overall it is recommended that the total thickness of the top layer be around 1.5mm, you can change this under “Fill > Infill Layer Thickness” in the print settings.
Additionally, the nozzle diameter also affects the network stiffness. If you use a small diameter nozzle, the printed frame will not be as stiff as a larger diameter nozzle, thus extruding a thicker frame.
2、Adjust cooling

Flexible filaments, e.g.TPU, requires careful printing of the top layer(source:Reddit的Orthodox waffle)
Since improper (i.e. not sufficient) cooling tends to weaken each grid, causing a pincushion effect, it is helpful to increase the cooling rate. If the fans are off while printing, the first step to take is to turn them on; make sure the slicer’s cooling fan is turned on (onCura, in the print settings, “Cooling > Enable print cooling”). If your slicer does not have this option, you will need to manually change the G-code. Using the M106 command you should be able to turn on the cooling fan.
If cushioning persists, cooling needs to be improved. After making sure the cooling fans are on, check if they are printing on the top layer atRun at 100% speed. If this is already the case, the fan may not be optimized to cool your prints. However, there are many modules online that can solve this problem, and using a desk fan or something similar to improve cooling only when printing the top layer can also help.
In addition to fan optimization, another way to strengthen gratings by making them solidify faster is to lower the extrusion temperature. This is an important step when extruding flexible materials. However, it is important to realize that this could compromise the adhesion of the layer. Consider temperature tower analysis and adjust extrusion speed accordingly.
Another solution is to add the top layer when printingZ-offset. Increasing the distance between the hot end and the print surface also increases heat transfer between the extruded material and the surroundings, allowing it to solidify faster and produce stronger screens.
Slow down and try different fill settings
Pilling can also be reduced by slowing down the print speed and increasing the infill percentage. Reducing the print speed will give the newly extruded network enough time to solidify and gain the rigidity required to support its own weight as well as that of the network that will be laid on top of it without bending.
If this is not enough, two other aspects related to infill can be modified to avoid (or reduce) bridged printing: increase the density (“Fill>Fill Density”) and modify the pattern (“Fill>Fill Pattern”). The first requires extracting more material and will increase overall print time; a typical percentage is 10-20%, so the amount you add will also depend on how much time and materials you are willing to sacrifice. At the same density, variations in the infill pattern can provide support for the top layer with fewer holes. In these cases, a gyroscope model may be most appropriate.
three,other suggestions

As you work on the solution, the top layer should look like the top section (source:ZoofusCos via Reddit)
Pillows are an unpleasant fault, but these simple solutions can easily eliminate the problem. Additionally, the following suggestions can help improve high-level results.
Check the material: Before changing the material or slicer settings in your quest to eliminate pillows, confirm that the problem is not extrusion. Check the nozzle and clean it for signs of clogging. Additionally, it is always a good practice to regularly calibrate your printer and extruder.
Incremental changes: To find the best slicer settings to reduce or eliminate pincushion, change them in small amounts, experimenting until you reach the optimal value. Also be sure to change one setting at a time. If you try all the changes at once, you won’t know which one works, and too many changes can cause other problems.
Top Layer Thickness: It’s always a good idea to plan and simulate your print in cutting software before printing. When doing this, try to plan the thickness of the top layer to be a multiple of the height of the layer.
Improved Top Surface Finish: Once most cushion defects have been corrected, it is still possible to smooth the exterior surface of your print. For the top surface, ironing and printing in a monotonous sequence can be a good option, however, other post-processing techniques can be applied to smooth the print (provided you take into account your model, your materials and time).
Daguang focuses on providing solutions such as precision CNC machining services (3-axis, 4-axis, 5-axis machining), CNC milling, 3D printing and rapid prototyping services.


