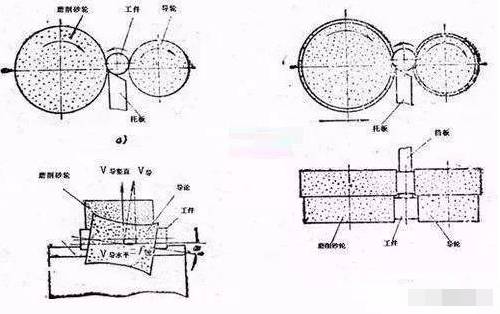
In centerless cylindrical grinding, the workpiece is placed between the guide wheel and the grinding wheel. One of the grinding wheels plays the role of grinding and the other grinding wheel plays the role of transmission, called the guide wheel. The bottom part of the part is supported by the support plate. The guide wheel is made of rubber, and its axis forms an angle θ with the grinding wheel in the vertical direction, causing the workpiece to rotate and advance.
Common grinding defects of centerless grinders and their elimination methods are summarized as follows:
1. The pieces are not round
Cause of event
(1) The guide wheel is not rounded
(2) The number of grinding operations is small or the ellipse of the previous process is too large.
(3) The grinding wheel is dull
(4) The amount of grinding is too large or the amount of tool feed is too large
Disposal method
(1) Rebuild the guide wheel and wait for the guide wheel to round (usually until there is no intermittent noise)
(2) Appropriately increase the number of grinding times
(3) Reshape the grindstone
(4) Reduce grinding volume and retooling speed
2. Parts have edges (polygons)
Cause of event
(1) The center of the room is not high enough
(2) The axial thrust of the workpiece is too great, causing the workpiece to press against the stop pin and prevent it from rotating evenly.
(3) The grinding wheel is unbalanced
(4) The center of the room is too high
Disposal method
(1) Accurately advance the centering of the part
(2) Reduce the tilt angle of the grinder guide wheel to 0.5° or 0.25°. If the blockage cannot be resolved, check the balance of the fulcrum.
(3) Balanced grinding wheel
(4) Correctly reduce the central height of the room
3. Vibration traces on the surface of the parts (that is, fish spots and straight white lines appear on the surface of the parts)
Cause of event
(1) Machine tool vibration caused by unbalanced grinding wheel surface
(2) The center of the coin moves forward, causing the coin to jump
(3) The grinding wheel is dull or the surface of the grinding wheel is too smooth
(4) The guide wheel turns too fast
Disposal method
(1) Balance the grinding wheel carefully
(2) Lower the center of the workpiece correctly
(3) Grinding wheel or appropriately increase the dressing speed of the grinding wheel
(4) Correctly reduce the guiding speed
4. The parts are conical
Cause of event
(1) Since the busbar of the front guide plate and guide wheel is too low or the front guide plate is tilted in the direction of the guide wheel, the front part of the workpiece is small.
(2) The rear part is small due to the low surface of the rear guide plate and the guide wheel busbar or the inclination of the rear guide plate towards the guide wheel.
(3) Taper occurs at the front or back of the part for the following reasons
① The grinding wheel itself has a taper due to incorrect dressing.
②The surface of the grinding wheel and guide wheel is worn
Disposal method
(1) Move the front guide plate correctly and adjust the front guide plate to be parallel to the guide wheel busbar.
(2) After adjustment, the guide surface of the guide plate is parallel to the guide wheel busbar and in one line.
①According to the taper direction of the workpiece, adjust the angle of the grinding wheel when changing the grinding wheel
②Grinding wheel and guide wheel

5. The center of the piece is large and the ends are small.
Cause of event
(1) The front and rear guide plates are evenly inclined toward the side of the grinding wheel.
(2) The grindstone is dressed in the shape of a drum
Disposal method
(1) Adjust the front and rear guide plates
(2) Modify the grinding wheel and do not make too large a tolerance each time.
6. There are circular threads on the surface of the workpiece
Cause of event
(1) The front and rear guide plates protrude from the surface of the guide wheel, so that the parts are scraped by the edge of the guide wheel when exiting or entering.
(2) The bearing is too soft, and the ground cut is embedded in the surface of the bearing to form protruding burrs, which are carved into threads on the surface of the workpiece.
(3) The coolant is not clean and contains chips or sand.
(4) Due to the large amount of grinding at the outlet, it is scraped by the edge of the grinding wheel.
(5) When the center of the workpiece is lower than the center of the grinding wheel, the vertical pressure is greater, causing sand and chips to adhere to the support bristles.
(6) The grinding wheel is dull
(7) There is too much excess left in one wheel or the wheel is too thick, resulting in extremely fine thread lines on the surface of the other part.
Disposal method
(1) Adjust the front and rear guide plates
(2) Replace the hair with a lubricated surface and higher hardness
(3) Replace the coolant
(4) Round the edge of the grinding wheel so that about 20 mm at the exit of the workpiece is not ground.
(5) Properly increase the center height of the room
(6) Grindstone
(7) Appropriately reduce the amount of grinding and slow down the speed of modification
7. Cut a small piece from the front of the piece
Cause of event
(1) The front guide plate protrudes beyond the surface of the guide wheel
(2) The front faces of the grinding wheel and the guide wheel are not aligned and are very different.
(3) Too much squeaking at the entrance
Disposal method
(1) Move the front guide back slightly
(2) Replace or modify the longer of the two
(3) Reduce the amount of grinding at the entrance
8. The middle or tail of the workpiece is cut and the cuts are as follows:
1. The incision is rectangular
Cause of event
(1) The rear guide plate has a good surface on the guide wheel, which prevents the parts from rotating and continuing to grind on the side surface.
(2) The rear support pad extends too far and the ground parts do not fall, preventing the rotation and advancement of the ground parts.
Disposal method
(1) Move the rear guide plate back appropriately
(2) Reinstall the support cushion
2. The incision is angular or has many micro-shaped marks
Cause of event
(1) The rear guide plate lags behind the surface of the guide wheel
(2) The center of the part advances too high, causing the part to jump out.
Disposal method
(1) Move the rear guide plate slightly forward.
(2) Reduce the center height of the room correctly
9. The surface brightness of the parts is not sufficient
Cause of event
(1) The tilt angle of the guide wheel is too large, resulting in the workpieces being cut too quickly.
(2) The modification speed of the grinding wheel is too fast, and the modification of the surface of the grinding wheel is not bright.
(3) The guide wheel is modified too thick
Disposal method
(1) Reduce the tilt angle
(2) Reduce the modification speed and modify the grinding wheel from scratch
(3) Rebuild the guide wheel
Note: It is prohibited to open the coolant when the grinding wheel is not working. If the coolant is opened first, in order to avoid the occurrence of a malfunction, the machine should be driven intermittently (that is, on, off, on, off). until coolant is emitted in all directions, then get to work.
Daguang focuses on providing solutions such as precision CNC machining services (3-axis, 4-axis, 5-axis machining), CNC milling, 3D printing and rapid prototyping services.


