Considering the problem that typical low-stiffness components of thin-walled ring-and-lug composites are prone to instability during processing, process analysis and improvement were carried out through a process reference conversion control, part stiffness reduction treatment, stiffness reinforcement and vibration absorption composite. , and equipment to maximize surface area and rigidity. Clamping and many other improvement measures were implemented to achieve stable treatment.
1 Preface
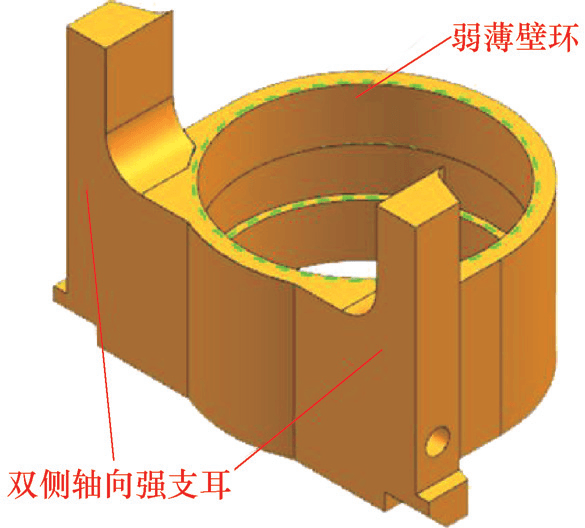
A typical composite structure of thin-walled weak ring and bilateral strong axial lugs is shown in Figure 1. The material of the parts is 30CrMnSiA steel conforming to GJB 1951-94 standard, and the quenched hardness is 30~35HRC. The surface roughness value of the workpiece is Ra=3.2 μm, the symmetry of the two ears is 0.05 mm, and the verticality of the bottom surface is 0.05 mm. Processing requirements are high. The wall thickness of the ring body is 2mm, the ring wall is too thin and the rigidity is insufficient. The main body of the workpiece has a low rigidity structure and is prone to instability during machining, especially when machining the outer wall of the ring and clamping thin-walled rings.[1,2]。
Figure 1 Typical composite structure of a weak, thin-walled ring and axially strong bilateral ears
2 Treatment analysis
Use of general machining technology[3-5]The morphology of the typical composite structure product processed with weak thin-walled ring and axially strong bilateral legs is shown in Figure 2. It has the following disadvantages.
1) There are obvious traces of knife connection in the middle of the bilateral axial legs. The upper and lower parts of the bilateral axial support legs are formed in two steps: milling the shape of the thin-walled ring and milling the shape of the bilateral axial support legs respectively. Since the process zero points of the two working steps do not coincide, obvious tool connection marks appear in the middle of the axial legs on both sides.
2) The thin-walled ring has obvious vibration marks in the middle of the shape. The wall thickness of the middle part of the ring body is 2mm, and the rigidity is obviously insufficient. When processing the thin-walled ring shape, the middle part is prone to instability and obvious vibration marks will occur. When the above problems overlap, the problem of easy processing instability becomes a production bottleneck.
Figure 2 Cut marks and vibration mark defects
3 Process optimization
Considering the shortcomings of general machining technology, composite processing measures such as “inner hole end face contour” process reference conversion control, the gradual reduction of workpiece rigidity processing , the combination of stiffness strengthening and vibration damping and absorption, and clamping to maximize the surface area and rigidity are adopted to achieve the steady-state processing goal of the composite structure d ‘a weak thin-walled ring and legs bilateral strong axials. Based on the technical analysis and ideas above, the process optimization process[6-8]As shown in Figure 3.

Figure 3 Processing process of composite structure of thin-walled weak ring and double-sided axial strong ears
3.1 Accurate conversion of process references
(1) After completing the inner shape and roughing the end face, finish turning the inner circle and the end face to form the process reference “inner hole end face”.
(2) The specific steps for the milling shape positioning reference are as follows.
1) Clamp the tooling on the flat nose pliers (see Figure 4), position the bottom surface of the tooling towards the end face of the workpiece and position the cylindrical surface of the tooling in the axial direction from the inside. Circle of the workpiece. Use a dial indicator to align the bottom surface of the tooling. The flatness is ≤ 0.01 mm. 2) Clamp the part to the tooling (see Figure 5), place the end face and inner hole of the part close to the locating surface of the tooling, and press it firmly with the pressure plate.

Figure 4 Tooling for milling contour positioning reference
Figure 5 Workpiece clamping tool for milling contour positioning reference
3) Two identical precision milling positioning steps are processed symmetrically on the appearance of the workpiece (see Figure 6), with a step height of 20mm, so that the process reference is converted from “inner face of ‘end of hole’ to ‘contour’.

Figure 6 Fine milling positioning steps processed symmetrically
3.2 Steady state processing control
(1) The specific steps for milling the thin-walled ring shape are as follows.
1) Precision milling positioning steps for clamping workpieces with flat nose pliers (see Figure 7).
Figure 7 Positioning Steps for Clamping and Precision Milling with Flat Nose Pliers
2) Use a polytetrafluoroethylene or nylon washer to insert it into the cleared groove of the internal thread of the workpiece, and use an external thread tool to screw into the internal thread of the workpiece to improve the rigidity of the cavity internal of the ring.
3) Treat rounded corners and thin-walled rings on both sides (see Figure 8).
Figure 8 Thin-walled finished ring shape
(2) The specific steps for milling the shape of the bilateral axial tab are as follows.
1) Turn the part over and screw the external thread mold (see Figure 9) into the internal thread of the part to improve the rigidity of the ring body cavity.
Figure 9 External thread mold
2) Use the clamping block to clamp the workpiece (see Figure 10) and tighten it with flat pliers.
3) Complete the appearance of the bilateral axial lug (see Figure 11). 
Figure 10 Clamping the workpiece using the clamping block

Figure 11 Finished appearance of the bilateral axial lug
(3) The specific steps of milling the outer steps of the bilateral legs are as follows.
1) Flat pliers clamp the clamping tool (see Figure 12).
2) The clamping tool axially presses the thin-walled annular body of the workpiece (see Figure 13).
3) Press the inner circle of the thin-walled ring of the workpiece into the expansion ring, and use an edge finder to find the inner circle of the expansion ring.
4) Finish processing the outer sides of bilateral legs, steps, chamfers and threads.
Figure 12 Clamping tool for milling the outer steps on both sides of the legs

Figure 13 Tooling axially presses the thin-walled annular body of the workpiece
4 Process
According to the process optimization plan, the specific processing process is as follows.
(1) Milling the profile positioning reference The process of milling the profile positioning reference is shown in Figure 14.
(2) Milling the appearance of the thin-walled ring The appearance of the thin-walled ring after milling is shown in Figure 15.

Figure 14 Processing shape positioning data
Figure 15 Shape of thin-walled ring after milling
(3) Milling the appearance of the bilateral axial lug The appearance of the bilateral axial lug after milling is shown in Figure 16.
Figure 16: Appearance of the bilateral axial lug after milling
(4) Milling the outer steps of the bilateral arms The outer steps of the bilateral arms after milling are shown in Figure 17.
Figure 17 The outer steps of the bilateral arms after milling
5 treatment effects
The processed finished product is shown in Figure 18. The test results are shown in Table 1. All parameters are qualified.
a) Main view

b) Axonometric drawing
18 finished products
Table 1 Finished product test results

6Conclusion
This paper studies the processing technology of thin-walled rings and lugs with low rigidity composite components, analyzes the shortcomings of general machining technology, and takes process optimization measures to process qualified finished products, thereby providing methods and practical experience for handling this type of parts. It is summarized as follows.
(1) Process reference Aiming at the problem that thin-walled ring and lug low-rigidity composite components are prone to instability during processing, process analysis and improvement are carried out through ‘process reference conversion control, part stiffness reduction treatment, stiffness enhancement and vibration damping and absorption, and a number of improvements such as tightening to maximize surface area and rigidity allows steady-state treatment.
(2) The steady-state machining control process adopts the processing method of gradually reducing the stiffness of the workpiece, and cooperates step by step and with the tool step by step to gradually reduce the overall stiffness of the workpiece so as to to achieve the objective of overall adaptation of the rigidity of the part. and prevent local instability during processing of the workpiece; adopt stiffness reinforcement and damping absorption; The vibration compounding process improves the rigidity of the inner circle of the thin-walled ring and the vibration damping and absorption capacity of the core part, providing a processing basis for steady-state cutting of the workpiece to machine; the clamping method maximizing surface area and rigidity is used; To achieve the goal of clamping the low-rigidity body stably and without deformation, cutting a stable part provides clamping conditions. Under the combined effect of these measures, the steady-state processing control of the composite low-rigidity component of the thin-walled ring and lug was achieved, and the vibration mark defects in the middle part of the Thin-walled ring shape were eliminated.
Daguang focuses on providing solutions such as precision CNC machining services (3-axis, 4-axis, 5-axis machining), CNC milling, 3D printing and rapid prototyping services.


