127 Sets Processing 4000mm 127 Sets High-Precision CNC Lathes
15 Years of Experience

CNC Knowledge: The treatment of the bore of the deep cavity is always vibrant and the parts are more and more abandoned?

The deep hole hole has always been a difficult problem in mechanical treatment and mold. . 1. Analysis of the drawing partly and processes planning Part drawing analysis Figure 1 shows the part of the hose mold, with 4 holes with a diameter of 48 × 215 mm to be treated. The external dimensions are […]

cnc knowledge: the treatment of the bore of the deep

The deep hole hole has always been a difficult problem in mechanical treatment and mold. .

1. Analysis of the drawing partly and processes planning

Part drawing analysis

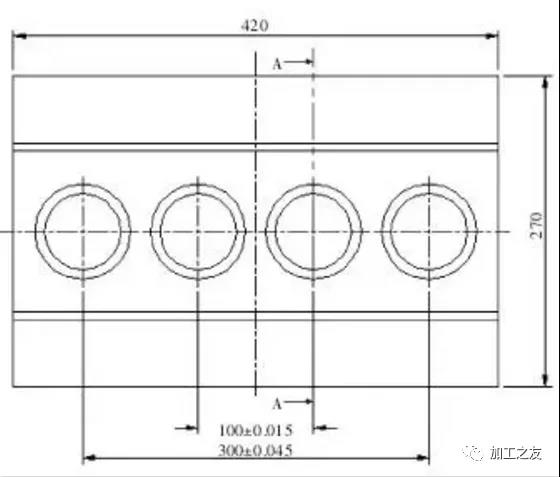
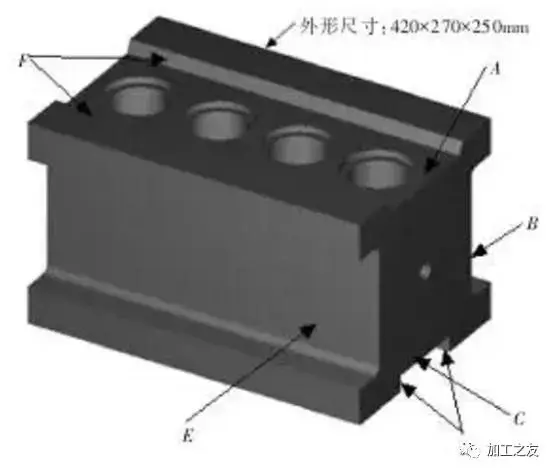
Figure 1 shows the part of the hose mold, with 4 holes with a diameter of 48 × 215 mm to be treated. The external dimensions are 420 × 270 × 250 mm, with 4 grooves on the rod, the bottom, the left and the right, the surface of the hole has steps and the slopes on both sides are the rows of the rows.

Figure 1 pieces of the pipe

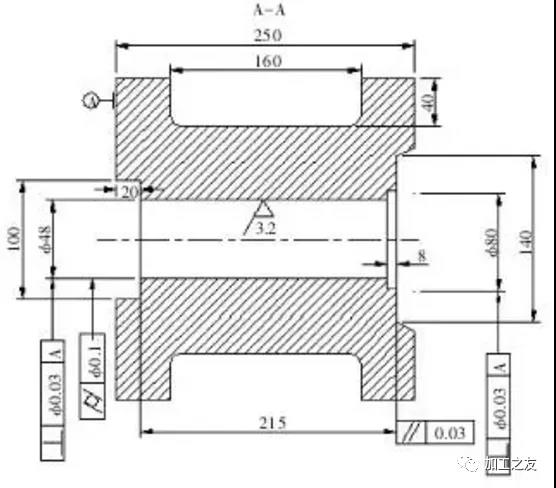
The size of the part is represented in the figure. The vertical is 0.03 mm. Save costs.

At that time, I was not sure such difficult pieces. After many attempts, a simple and reasonable treatment plan has been developed.

Process planning

Simple machining sequence before the ooming of parts
After the return of the fine material, the grinding first treats the grooves on both sides, as shown in Figure 1, the B and E are rough and then refined, and the treatment is reached.

The steps at the front of the treatment are thicker, leaving a margin of 0.5 mm on one side, as shown in Figure 1.
The stages of the lower machining surface are thicker, leaving a margin of 0.5 mm on one side, as shown in Figure 1.
Then reinstall the clamping table, divide the four sides into the center, pierce the center and position it in stages, and treat it with drilling bits with a diameter of 10 mm, 24 mm and 35 mm in diameter. 44 mm.
Once finished, go to the treatment surface and the bottom of the large water grinding, as shown in Figure 2 and grind it to a number, ensuring that the parallelism is 0.03 mm.
As shown in Figure 1, the 0.3 mm finishing allowance is reserved for the lateral grinding of B and E.
Partial tightening and positioning reference
The room is directly tight on the CNC Workbench and the 4 mold pins are coded closely.
2. CNC machining of the parts
Part drawing analysis
Self-fabricated work-study tool: first make a boring tool holder as shown in Figure 3. The material is 837 hours, runs about first, reserve a 0.5 mm margin and use a grinder. external cylindrical to treat it. The knife support inserted into blade is purchased with standard parts of 10 × 10 mm, which is easy to replace the blade and ensure the size.
The tilt angle of the interior knife support is 20 ° and the thread cut is treated, and is slightly closely adapted. The drilling bore tool support with hexagon screws M6mm and lock the tool holder with hexagonal screws. The standard knife support is equipped with a carbide blade with a main deviation angle of 30 °, an angle of air avoidance of 15 ° of the rear blade and a net angle of the blade with an angle of R0.3 ~ R0.4 mm, minimize the contact surface to avoid vibrations.
1739294095 589 CNC Knowledge The treatment of the bore of the deep

1739294095 464 CNC Knowledge The treatment of the bore of the deep

Figure 2 Dimensions of the parts
Confirmation of the treatment plan
Treatment diagram 1
The rapid thread cutting process is the most direct and simplest method, and it is not necessary to open thicker. It is easy to break the wire and the surface roughness value does not meet the requirements.
Treatment diagram 2
The slow thread treatment is used because the depth of the hole is easy to break the wires, but the treatment costs for each hole are about 1,945 yuan. calculation.
Treatment diagram 3
CNC Form Milling Treatment, use elongating knives to load the runden cutting or diamond ally cutters and the treatment in deep layers due to the large contact zone, the sound is very strong and hard during each process of power and retraction, and the roughness of the surface produced is the duration The value and the dimensional precision are very mediocre, and there is from time to time the reversed grooves in the middle.
Treatment diagram 4
CNC Boring Processing, the machine model is 850b, which is suitable for general machine tools. And processing time is a total of each hole. By comparing the cost, treatment accuracy and processing difficulty, the solution for treatment for solution 4 is selected.
CNC Boring Processing Process
Clip correction
For machine tools on the room, the 4-cork position is tightened, and the parallel position and the horizontality of the part are leveled. Be difficult to ensure the perpendicular of the hole. The calibration tolerance is controlled at less than 0.02 mm and the four sides are divided into four sides.
Display holder
The first rough treatment uses a counter card to measure the size of the boredom insert than the large tool holder. The main deviation angle of the bore insert is 30 °, the surface of the rear tool is 15 ° and the rounded angle of the tip of the tool is R0.3 ~ R0.4 MM, in order to minimize the contact surface and reduce stress to prevent the reverse shock. The surface of the room with the boring point is 0.
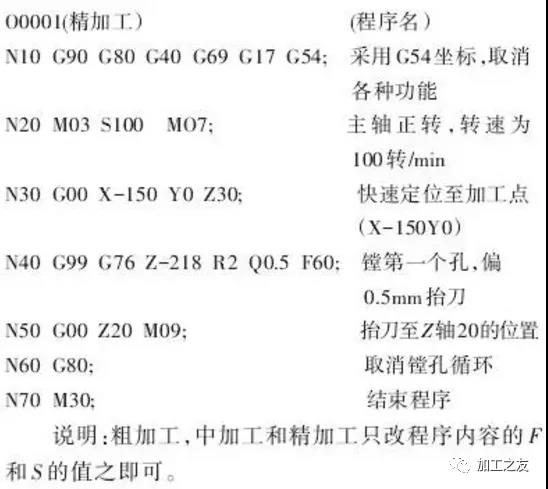
Boring procedure
Instruction format g76x_y_z_r_q_p_f_ ;, G76 is the fine final control, the coordinate position of the X / y / z hole, P is a break at the bottom of the hole, q indicates the break and the shift after the treatment of the tool, so that prevents scratching the machined side when lifting the tool.

Rough treatment parameters
The speed of rotation s is 120 rpm, the power f is 80 mm / min, the cutting volume is 1.0 mm, the cutting oil is the coolant, the fluidity of the Oil should be good and cooling is in place.
Semi-finishing parameters settings
Once the rough treatment is completed, the number of cards and inspection is carried out. F is 70 mm / min and the cut volume is 0.6 mm.
Finishing parameters settings
Each hole is treated with a new blade, with a speed of 100 rpm and 60 mm / min. First try the treatment of holes, because there is a 15 mm stage at the top of the room until the dimensions meet the drawing requirements.
III.
1739294096 249 CNC Knowledge The treatment of the bore of the deep

Note: rough treatment, average treatment and finish must only modify the values ​​of F and S of the content of the program.
This set of treatment plans has undergone several improvements on site, starting with the appearance treatment plan. Through treatment, the customer is very that the headache is that the second process machine one day takes to polish a hole and that the roundness of the round hole is not qualified.

1739294096 40 CNC Knowledge The treatment of the bore of the deep

Figure 3 Annuyeux
The treatment of boredom is mainly the adjustment of the two power and speed parameters. Min. , and cylindrical and roughness are all the values ​​meet standards, reducing the secondary treatment time of the customer, really improving the efficiency of production and winning the praise of customers.
Although the final boring treatment plan for this set is simple, the process is really not easy. And excessive force will make it too high. Therefore, in the context of treatment parameters such as the selection and precautions of the blades, we hope to play a role in reference and prevention.

Daguang focuses on providing solutions such as precision CNC machining services (3-axis, 4-axis, 5-axis machining), CNC milling, 3D printing and rapid prototyping services.
CNC Experts

Picture of JinShui Chen

JinShui Chen

Rapid Prototyping & Rapid Manufacturing Expert

Specialize in CNC machining, 3D printing, urethane casting, rapid tooling, injection molding, metal casting, sheet metal and extrusion

CNC Recent Posts

CNC News

Welcome to GreatLight Metal,Maximum Processing Size 4,000 mm

Precision Machining CNC Quote Online

Loading file

Upload Click here to upload or drag and drop your model to the canvas.

The model is too large and has been resized to fit in the printer's build tray. [Hide]

The model is too large to fit in the printer's build tray. [Hide]

The model is too large, a fitting printer is selected. [Hide]

The model is too small and has been upscaled. [Hide]

Warning: The selected printer can not print in full color [Hide]

Warning: obj models with multiple meshes are not yet supported [Hide]

Warning: Unsupported DXF entity  [Hide]

Warning: could not arrange models [Hide]


File Unit:      
Scale:
%
L × W × H:
X: × Y: × Z:  cm 
Rotation:
X: ° Y: °  
⚡ Instant Quote for Precision Manufacturing

Submit your design files (STEP/IGES/DWG) and receive a competitive quote within 1 hour, backed by ISO 9001-certified quality assurance.

📋 How It Works

  1. Upload & SpecifyShare your 3D model and select materials (Aluminum/Stainless Steel/Titanium/PEEK), tolerances (±0.002mm), and surface treatments.

  2. AI-Powered AnalysisOur system calculates optimal machining strategy and cost based on 10+ years of automotive/aerospace data.

  3. Review & ConfirmGet a detailed breakdown including:
    - Volume pricing tiers (1-10,000+ units)
    - Lead time (3-7 days standard)
    - DFM feedback for cost optimization

Unit Price: 

Loading price
5 Axis CNC Machining Equipment
4 Axis CNC Machining Equipment
3 Axis CNC Machining Equipment
CNC Milling & Turning Equipment
Prototype and Short-Run Injection Moldings Exact plastic material as final design
Volume Metal Die Casting Services - Precision Cast Parts
Bridge the Gap From Prototype to Production – Global delivery in 10 days or less
Custom high-precision sheet metal prototypes and parts, as fast as 5 days.
Custom Online 3D Printing Services
Design Best Processing Method According To 3D Drawings
Alloys Aluminum 6061, 6061-T6 Aluminum 2024 Aluminum 5052 Aluminum 5083 Aluminum 6063 Aluminum 6082 Aluminum 7075, 7075-T6 Aluminum ADC12 (A380)
Alloys Brass C27400 Brass C28000 Brass C36000
Alloys Stainless Steel SUS201 Stainless Steel SUS303 Stainless Steel SUS 304 Stainless Steel SUS316 Stainless Steel SUS316L Stainless Steel SUS420 Stainless Steel SUS430 Stainless Steel SUS431 Stainless Steel SUS440C Stainless Steel SUS630/17-4PH Stainless Steel AISI 304
Inconel718
Carbon Fiber
Tool Steel
Mold Steel
Alloys Titanium Alloy TA1 Titanium Alloy TA2 Titanium Alloy TC4/Ti-6Al 4V
Alloys Steel 1018, 1020, 1025, 1045, 1215, 4130, 4140, 4340, 5140, A36 Die steel Alloy steel Chisel tool steel Spring steel High speed steel Cold rolled steel Bearing steel SPCC
Alloys Copper C101(T2) Copper C103(T1) Copper C103(TU2) Copper C110(TU0) Beryllium Copper
Alloys Magnesium Alloy AZ31B Magnesium Alloy AZ91D
Low Carbon Steel
Alloys Magnesium Alloy AZ31B Magnesium Alloy AZ91D
ABS Beige(Natural) ABS Black ABS Black Antistatic ABS Milky White ABS+PC Black ABS+PC White
PC Black PC Transparent PC White PC Yellowish White PC+GF30 Black
PMMA Black PMMA Transparent PMMA White
PA(Nylon) Blue PA6 (Nylon)+GF15 Black PA6 (Nylon)+GF30 Black PA66 (Nylon) Beige(Natural) PA66 (Nylon) Black
PE Black PE White
PEEK Beige(Natural) PEEK Black
PP Black PP White PP+GF30 Black
HDPE Black HDPE White
HIPS Board White
LDPE White
This is a finish of applying powdered paint to the components and then baking it in an oven, which results in a stronger, more wear- and corrosion-resistant layer that is more durable than traditional painting methods.
No coating required, product’s natural color!
This is a finish of applying powdered paint to the components and then baking it in an oven, which results in a stronger, more wear- and corrosion-resistant layer that is more durable than traditional painting methods.
This finishing option with the shortest turnaround time. Parts have visible tool marks and potentially sharp edges and burrs, which can be removed upon request.
Sand blasting uses pressurized sand or other media to clean and texture the surface, creating a uniform, matte finish.
Polishing is the process of creating a smooth and shiny surface by rubbing it or by applying a chemical treatmen
A brushed finish creates a unidirectional satin texture, reducing the visibility of marks and scratches on the surface.
Anodizing increases corrosion resistance and wear properties, while allowing for color dyeing, ideal for aluminum parts.
Black oxide is a conversion coating that is used on steels to improve corrosion resistance and minimize light reflection.
Electroplating bonds a thin metal layer onto parts, improving wear resistance, corrosion resistance, and surface conductivity.
This is a finish of applying powdered paint to the components and then baking it in an oven, which results in a stronger, more wear- and corrosion-resistant layer that is more durable than traditional painting methods.
Please provide additional text description for other surface treatment requirements!
Material
Material
  • CNC Metals
    • Aluminum
    • Brass
    • Stainless steel
    • Inconel718
    • Carbon Fiber
    • Tool Steel
    • Mold Steel
    • Titanium
    • Alloy Steel
    • Copper
    • Bronze
    • Low Carbon Steel
    • Magnesium
  • CNC Plastics
    • ABS
    • PC
    • PMMA (Acrylic)
    • PA (Nylon)
    • PE
    • PEEK
    • PP
    • HDPE
    • HIPS
    • LDPE
Printer
Printer
  • CNC Metals
    • 5 Axis CNC Machining
    • 4 Axis CNC Machining
    • 3 Axis CNC Machining
    • CNC Milling & Turning
    • Rapid Tooling
    • Metal Die Casting
    • Vacuum Casting
    • Sheet Metal Fabrication
    • SLA 3D Printing
    • SLS 3D Printing
    • SLM 3D Printing
  • Rapid Prototyping
    • Design Best Processing Method According To 3D Drawings
Post-processing
Post-processing
  • As Machined(Product’s natural color)
  • Sand Blasting
  • Polishing
  • Brushed Finish
  • Anodizing
  • Black Oxide
  • Electroplating
  • Paint Coating
  • Powder Coating
  • Other surface treatment requirements
Finalize
The world's first CNC machining center that dares to provide free samples!

Free for first product valued at less than $200. (Background check required)

precision machining cnc quote online

15 Years CNC Machining Services

When you’re ready to start your next project, simply upload your 3D CAD design files, and our engineers will get back to you with a quote as soon as possible.
Scroll to Top

ISO 9001 Certificate

ISO 9001 is defined as the internationally recognized standard for Quality Management Systems (QMS). It is by far the most mature quality framework in the world. More than 1 million certificates were issued to organizations in 178 countries. ISO 9001 sets standards not only for the quality management system, but also for the overall management system. It helps organizations achieve success by improving customer satisfaction, employee motivation, and continuous improvement. * The ISO certificate is issued in the name of FS.com LIMITED and applied to all the products sold on FS website.

greatlight metal iso 9001 certification successfully renewed
GB T 19001-2016 IS09001-2015
✅ iso 9001:2015
greatlight metal iso 9001 certification successfully renewed zh

IATF 16949 certificate

IATF 16949 is an internationally recognized Quality Management System (QMS) standard specifically for the automotive industry and engine hardware parts production quality management system certification. It is based on ISO 9001 and adds specific requirements related to the production and service of automotive and engine hardware parts. Its goal is to improve quality, streamline processes, and reduce variation and waste in the automotive and engine hardware parts supply chain.

automotive industry quality management system certification 01
Certification of Production Quality Management System for Engine Hardware Parts Engine Hardware Associated Parts
automotive industry quality management system certification 00
发动机五金零配件的生产质量管理体系认证

ISO 27001 certificate

ISO/IEC 27001 is an international standard for managing and processing information security. This standard is jointly developed by the International Organization for Standardization (ISO) and the International Electrotechnical Commission (IEC). It sets out requirements for establishing, implementing, maintaining, and continually improving an information security management system (ISMS). Ensuring the confidentiality, integrity, and availability of organizational information assets, obtaining an ISO 27001 certificate means that the enterprise has passed the audit conducted by a certification body, proving that its information security management system has met the requirements of the international standard.

greatlight metal technology co., ltd has obtained multiple certifications (1)
greatlight metal technology co., ltd has obtained multiple certifications (2)

ISO 13485 certificate

ISO 13485 is an internationally recognized standard for Quality Management Systems (QMS) specifically tailored for the medical device industry. It outlines the requirements for organizations involved in the design, development, production, installation, and servicing of medical devices, ensuring they consistently meet regulatory requirements and customer needs. Essentially, it's a framework for medical device companies to build and maintain robust QMS processes, ultimately enhancing patient safety and device quality.

greatlight metal technology co., ltd has obtained multiple certifications (3)
greatlight metal technology co., ltd has obtained multiple certifications (4)

Get The Best Price

Send drawings and detailed requirements via Email:[email protected]
Or Fill Out The Contact Form Below:

All uploads are secure and confidential.