In this article, Mohou.com will learn with you the steps needed to clean 3D printed resin parts, so that the resin prints have good surface effects, as well as different methods to complete each step.
Safety first, first understand the tools needed to clean resin prints
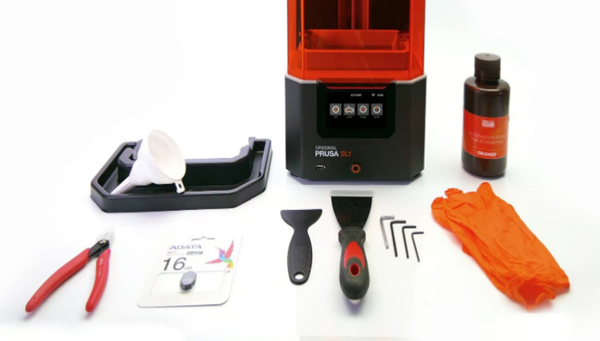
Cleaning Equipment Kit Essentials (Source: All3DP)
Before you begin, make sure you understand the safety precautions for handling vats of cured resin. These resins are toxic and must be disposed of properly. Direct contact with skin should be avoided. Since some products can emit toxic fumes, spills can also be messy, so make sure you have a clear work area that allows you to move around unhindered and maintain good ventilation.
To do this correctly and safely, you will need nitrile gloves, safety glasses, and a work space with open windows for ventilation. If you are post-processing many parts or the process takes more than a few minutes, you will also need to wear an FFP2 (or similar) mask.
If resin comes into contact with exposed skin, wash it immediately with soap and water. Avoid leaving traces of resin on objects with which it comes into contact. If spilled, it should be cleaned immediately before the resin hardens, simply wipe with a paper towel.
Remember that gloves and goggles should be worn at all times, not just when cleaning resin.
Here are the specific steps for cleaning resin prints:
1. Washing the parts
Rinse the print to remove uncured resin (Source: All3DP)
When your part comes out of the printer, it will be covered in uncured resin. You need to rinse it before continuing with post-treatment.
Method 1: Soak and Rinse
The easiest way is to soak the pieces in a basin of isopropyl alcohol (IPA). Move the pieces and rinse them to remove the resin. This method is simple and quick, but the cleaning effect is not as comprehensive as the following methods. Two or more rinses may be necessary to remove any excess resin from the surface.
water washed resin
Washable resin is one of the most environmentally friendly and perhaps least harmful options today. This resin may not be as strong as traditional resin because it is designed to react with water, so it may not be the best choice if the final part is exposed to water. The good thing is that it is easier to clean. Remember that you should always wear gloves when doing this!
Method 2: Cleaning Station
For those who need to repeatedly clean their resin prints, cleaning stations are probably the most common option. Many manufacturers offer these two-in-one machines, which have a cleaning container and an impeller (or similar device) to spin the liquid and clean the print. Equipment options include workstations for cleaning and curing, but you can also find cleaning stations dedicated to cleaning.
Method 3: Ultrasonic bath
Ultrasonic baths, like those used to clean jewelry, are a professional (and somewhat expensive) way to clean resin prints. Fill the bath with cleaning solution so that it covers the impression and let it sit for a few minutes. This will remove a thin layer of uncured resin stuck to the model, leaving a smooth, clean surface.
Although some people claim to use IPA as their liquid of choice, this is generally not advised for safety reasons: IPA is flammable, so using it with an ultrasonic bath poses a fire risk. There are several safe cleaning fluids, including tripropylene glycol monomethyl ether (TPM) and dipropylene glycol monomethyl ether (DPM). (For the average consumer, Formlabs recommends using TPM and not DPM.
2. Remove the media
The supports can be removed using a flat cutter (Source: All3DP)
Next, remove the tree support structure from the model. This can be done before or after curing, but it is easiest to do it before curing. Always be aware of flying media debris and collect it to ensure your workspace remains clean and free of debris.
Method 1: Take it apart with your hands
If you don’t care about the small details, disassembling the brackets by hand is the quickest way. However, if your model has detailed features, it’s best to err on the side of caution.
Method 2: Use a flat end mill
For more complex parts, use a flat cutter to carefully cut out the supports. Get as close to the model as possible without damaging the surface.
Both methods will leave small dents in the print. This is unavoidable, but can be easily fixed with a little sandpaper and a little patience.
3. Print processing,Click to find out how long it takes for 3D printing resin to cure.
Curing the prints stabilizes the material properties (Source: All3DP)
The final stage of post-processing is UV curing. This is necessary for many functional prints because it ultimately determines the material properties of the model. Keep in mind that different resins may require different curing times depending on specific properties. We therefore recommend checking the manufacturer’s instructions or carrying out further research.
Method 1: Curing Station
Many resin printer manufacturers also sell curing stations. These curing stations are specifically optimized for their resins, allowing fine tuning of curing times. This is particularly useful for large prints and professional environments. For more information, see our Resin Cleaning and Curing Station Buying Guide.
Method 2: Nail Lamp Curing Light
This is an inexpensive and convenient way to quickly solidify a model. Simply place it under a manicure lamp and let it sit overnight. Adding a dial can help achieve a more even exposure.
Method 3: DIY Curing Chamber
Many hobbyists make inexpensive homemade curing chambers, which are essentially makeshift versions of commercial curing stations. Different setups require different materials and techniques, but can also be easily accomplished by placing a UV lamp in a foil-lined box. Placing the model on a solar or battery-powered turntable can help achieve an even exposure.
Method 4: Solar Energy
To go completely green, use old solar energy. Placing the pieces outside on a sunny day will provide even UV exposure. The main disadvantage of this method is that it requires a lot of patience. You must wait for the sun to strike; depending on the size of the print, this can take around 6 hours or more. Remember, a curing machine (even a DIY machine) only takes five minutes of your time. The result should be an opaque and not shiny effect.
Processing completed
Post-processing will give you the best print quality and resistance (Source: All3DP)
With these three simple steps, your resin print is post-processed and ready to use! From there, you can work it as is, or sand and stain it as finely as you like.
Daguang focuses on providing solutions such as precision CNC machining services (3-axis, 4-axis, 5-axis machining), CNC milling, 3D printing and rapid prototyping services.
