Simply put, macros use formulas to process parts. For example, if there is no macro for an ellipse, we need to calculate the points on the curve point by point and then slowly approximate it with a straight line. If it is a room with high demands on softness, then a lot of. the points need to be calculated, but after applying the macro we enter the ellipse formula into the system, then we give the Z coordinate and add a quantity each time. Then the macro will automatically calculate the X coordinate and perform the cutting. The macro plays a main role in the program’s calculations.
1
About macro programs
What is a macro program
When programming, we will store a series of instructions that can complete a certain function in memory like a subroutine, and call them with a total instruction. When using it, we just need to give this total instruction to execute the stored function. A series of instructions is called a user macro program body, or macro program for short.
This general instruction is called the user macro program call instruction. When programming, programmers only need to memorize macro instructions instead of macro programs.
When is macro programming used?
1) Manual programming to process formula curves (simple calculation, quick entry)
2) Regular cutting path (as cutting module)
3) Control between programs (program programming)
4) Tool management (tool wear)
5) Automatic measurement (probe integrated into the machine)
The difference between macro programs and ordinary programs
1) In the macro program itself, variables can be used, values can be assigned to variables, operations can be performed between variables, and programs can jump.
2) In ordinary programs, only constants can be specified and operations cannot be performed between constants. The program can only be executed sequentially and cannot jump, so the function is fixed and cannot be changed.
3) Macro function is a special function for users to improve the performance of CNC machine tools. Clever use of macro programs in processing similar parts will allow you to achieve twice the result with half the effort.
2
Macro program variables and formats
Characteristics of macro programs
Macro programs can use variables to perform corresponding operations; the actual values of the variables can be assigned to the variables by the macro program instructions.
Three types of variables
CNC system variables are expressed as “#” followed by 1 to 4 digits. There are three types of variables:
(1) Local variables: #1~#33 are variables used locally in macro programs and are used for transferring independent variables.
(2) Public variables: Users can use them freely. They are common to subprograms and macroprograms called by the main program. #100~#149, after power off, all variable values are cleared, while #500~#509, after power off, variable values can be saved.
(3) System variable: defined by a 4-digit number followed by it, it can obtain read-only or read/write information contained in the machine tool processor or NC memory, including parameters exchanges linked to the processor of the machine tool, to the machine tool. status acquisition parameters, system information such as processing parameters.
Simple macro program call format
Single calling of a macro program means that in the main program the macro program can be called once by a single program segment.
Call Instruction Format:
G65 P (macro program number) L (number of repetitions) (variable assignment).
Among them: G65 – macro program call command;
P (macro program number) – the code name of the called macro program;
L (number of repetitions) – the number of times the macro program is repeated. When the number of repetitions is 1, it can be omitted;
(Variable Assignment) – Assign values to variables used in macro programs.
The same thing between macroprograms and subroutines is that a macroprogram can be called by another macroprogram, up to 4 times.
Macro program writing format
The writing format for macroprograms is the same as that for subroutines. Its format is:
0~ (0001~8999 is the macro program number)
Order N10
N~M99
In the above macro program contents, in addition to commonly used programming instructions, variables, arithmetic operation instructions and other control instructions can also be used. Variable values are assigned in the macro program’s call instructions.
3
Application of the FANUC system macro program
(1) Grooving macro program
1) WHILE statement
G00X52Z2;
#2=-14;
This is the starting point of the tool in the z direction (the width of the tool is 4 mm, the starting point is fixed at Z-14)
DURING 〔#2 GE -30〕DO2;
is a constraint in the z direction. When z is -30, the z direction will no longer move.
G00Z〔#2〕 ;
Current position in z direction
#2=#2-2;
No movement in z direction, 2 mm each time
#1=52;
is the starting point in the x direction
DURING 〔#1 GE 20〕DO1;
Stresses in the X direction, when the diameter is equal to 20, there will be no cutting
G01X〔#1〕F0.2 ;
Cutting depth in x direction
G00X〔#1+1〕 ;
Relative shrinkage amount in x direction
#1=#1-1;
Step distance in x direction (cut 1mm each time)
END1;
G00X52;
END2;
Complete program:
O1234;
G40 G97 G99;
T0101;
S1000M3;
G00X52Z2;
#2=-14;
DURING 〔#2GE-30〕DO2; END1;
G00Z〔#2〕 ;
#2=#2-2;
#1=52
DURING 〔#1GE20〕DO1;
G01X〔#1〕F0.2 ;
G00X〔#1+1〕 ;
#1=#1-1;
G00X52;
END2;
G00 X150 Z150;
M30;
2) SI declaration
G00X52Z-2;
#1=-14;
is the starting point of the tool in the z direction (the width of the tool is 4 mm)
N2 #1 = #1-2;
is the moving distance in the z direction
#2=52;
is the starting point in the x direction
N1#2=#2-1;
is the step distance in the x direction (each cutting depth is 1mm)
G01X〔#2〕F0.2 ;
Current position in X direction
G00X〔#2+1〕 ;
Relative shrinkage amount in the X direction
IF 〔#2 GE 21〕GOTO1;
Constraints in the x direction (when the value of x is reduced to 20, go to the next procedure and will not return)
G00X52 ;
X retracts to position 52
G00Z〔#1〕 ;
Current position in Z direction
IF 〔#1 GE -30〕GOTO2 ;
Constraints in the Z direction When z is equal to -30, the z direction will no longer move.
Complete program:
O1234;
G40G97G99;
T0101;
S1000M3;
G00X52Z-2;
#1=-14;
N2 #1 = #1-2;
#2=52;
N1#2=#2-1;
G01X〔#2〕F0.2 ;
G00X〔#2+1〕 ;
IF〔#2GE21〕GOTO1;
G00X52;
G00Z〔#1〕 ;
IF〔#1GE-30〕GOTO2;
G00X200 ;
Z200;
M5;
M30;
(2) Programming ellipses
1) Standard format of the elliptical WHILE instruction:
#1=one;
a: The starting point of the tool is one mm in the positive direction relative to the Z axis of the ellipse
WHILE〔#1 GE b〕DO1 ;
b: The end point of ellipse processing is in the negative direction b mm relative to the Z axis of the ellipse (if a full half ellipse is processed, then a and b are two values with the same value and different signs)
#2= c*SQRT〔1-#1*#1/d*d〕;
c: minor semi-axis of the ellipse
d: The major semi-axis of the ellipse (calculate #2 according to the ellipse formula, the major semi-axis is d, the minor semi-axis is c, #2 represents the value of the value of Z, SQRT means square root)
G01 X〔±2*#2+e〕Z〔#1±f〕 ;
e: The offset (diameter value) of the X axis of the ellipse relative to the part coordinate system
f: offset of the Z axis of the ellipse relative to the part coordinate system
#1 = #1-1; Step distance (move 1mm each time)
END1;
Note: When rotating a concave ellipse, the “±” in parentheses after when rotating a convex ellipse, the “±” in parentheses after
When the X axis of the ellipse moves in the positive direction, the “±” in parentheses after Z becomes “+”; when the X axis of the ellipse moves in the negative direction, the “±” in parentheses after Z becomes “+”; Z becomes “-“
2) Standard format of the elliptical IF instruction
#1 = one;
a: The starting point of the tool is one mm in the positive direction relative to the Z axis of the ellipse.
N1#2=b*SQRT〔1-#1*#1/c*c〕;
b: minor semi-axis of the ellipse c: major semi-axis of the ellipse (according to the ellipse formula X/c+ Y/b=1, SQRT means the square root)
G01X〔±2*#2+d〕Z〔#1±e〕F0.2; d: offset (diameter value) of the X axis of the ellipse relative to the zero point of the coordinates e: offset of the Z axis of the ellipse relative to the offset of the zero plane
#1=#1-1;
Step distance (move 1mm each time)
IF〔#1 GE -f〕GOTO1
f: End of elliptical treatment
Note: When rotating a concave ellipse, the “±” in parentheses after when rotating a convex ellipse, the “±” in parentheses after When the X axis of the ellipse moves in the positive direction, the “±” in parentheses after Z becomes “+”; when the X axis of the ellipse moves in the negative direction, the “±” in parentheses after Z becomes “+”; Z becomes “-“.
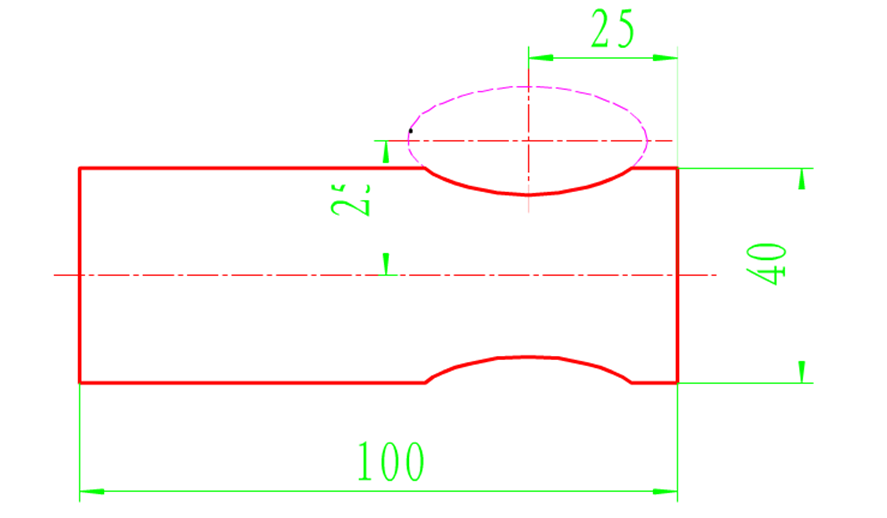
WHILE statement
#1=20;
DURING 〔#1GE-20〕DO1;
#2=10*SQRT〔1-#1*#1/400〕;
G01X〔-2*#2+50〕Z〔#1-25〕 ;
#1=#1-1;
END1;
SI instruction
#1=20;
N1#2=10*SQRT〔1-#1*#1/400〕 ;
G01X〔-2*#2+50〕Z〔#1-25〕F0.2 ;
#1=#1-1;
IF〔#1GE-20〕GOTO1 ;
complete program
O1234;
G40G97G99;
T0101;
S1000M3;
G00X50Z2;
G73U5R5;
G73 P10 Q20 U0.5 F0.2;
N10 G0 G42 Z-5;
#1=20;
DURING 〔#1GE-20〕DO1;
#2=10*SQRT〔1-#1*#1/400〕;
G01X〔-2*#2+50〕Z〔#1-25〕F0.2 ;
#1=#1-1;
END1;
G00X50 ;
N20 G00 G40 Z2;
G70P10Q20;
G00X200 ;
Z200;
M5;
M30;
The full format of the IF statement is omitted (the same goes for the IF statement, provided a loop is added). In the FANUC-0i system, macro programs can only be added to the G73.
(3) Treatment of parabolas
1) Standard format of the WHILE parabolic instruction:
#1 = one;
a: The starting point of the tool is one mm in the direction of the parabolic axis Z
WHILE〔#1 GE -b〕DO1;
b: is the processing length of the ellipse in the z direction
#2=SQRT〔-#1*5/3〕;
(According to the parabola formula Z=-3/5*X*X, find the value X, which is #2, where SQRT means square root)
G01 X〔±2*#2+c〕Z〔#1〕 ;
c: is the offset (diameter value) of the X axis of the parabola relative to the coordinate system of the part, “±”
When “+” is taken it is convex and when “-” is taken it is concave.
#1 = #1-1; Step distance (move 1mm each time)
END1;
2) Standard format of parabolic IF instruction
#1 = one;
a: The starting point of the tool is one mm in the direction of the parabolic axis Z
N1 #2=SQRT〔-#1*5/3〕 ;
(According to the parabola formula Z=-3/5*X*X, find the value X, which is #2, where SQRT means square root)
G01 X〔±2*#2+b〕Z〔#1〕 ;
b: is the offset (diameter value) of the direction axis X of the parabola relative to the zero point of the coordinates. “±” is convex when “+” is taken, and concave when “-” is taken.
#1=#1-1;
(Step distance in Z direction, each movement is 1mm)
IF〔#1 GE -c〕GOTO1; c: is the processing length of the ellipse in the z direction
Another form of parabolic IF instruction
#1 = one;
N1 #2=SQRT〔(+)#1*5/3〕;
The “+” sign can be omitted
G01 X〔2*#2+b〕Z〔-#1〕 ;
#1=#1+1;
IF〔#1 THE c〕GOTO1;
Suppose the parabola is in the positive direction of Z, then use Z〔-#1〕 to mirror the parabola in the negative direction;
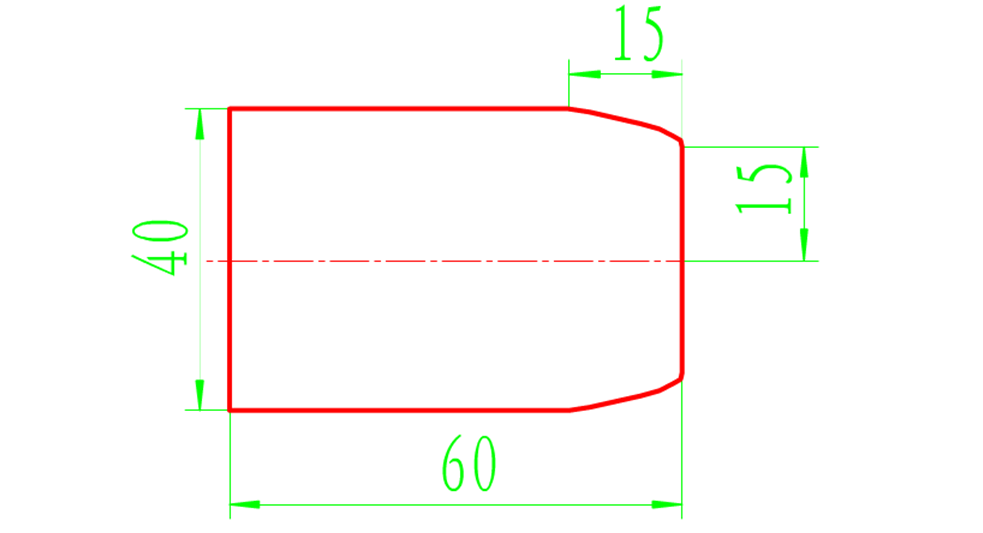
WHILE statement
#1=0;
WHILE〔#1 GE -15〕DO1 ;
#2=SQRT〔-#1*5/3〕 ;
G01 X〔2*#2+30〕Z〔#1〕 ;
#1=#1-1;
END1;
SI instruction
#1=0;
N1 #2=SQRT〔-#1*5/3〕 ;
G01X〔2*#2+30〕Z〔#1〕 ;
#1=#1-1;
IF〔#1 GE -15〕GOTO1 ;
complete program
O1234;
G40 G97 G99;
T0101;
S1000M3;
G00X42Z1;
G73U5R5;
G73 P10 Q20 U0.5 F0.2;
N10 G00 G42 Z0 ;
#1=0;
WHILE〔#1 GE -15〕DO1 ;
#2=SQRT〔-#1*5/3〕;
G01 X〔2*#2+30〕Z〔#1〕 ;
#1=#1-1;
END1;
G00X42;
N20 G00 G40 Z2;
G70P10Q20;
G00X200 ;
Z200;
M5;
M30;
(4) The difference between WHILE statement and IF statement
1) The two statements come back in different directions
WHILE statement goes back
Example: WHILE[#1 GE 20]DO1;
G01X〔#1〕F0.2 ;
Suppose that when the machine tool reaches this sentence, #1=20, it will continue to execute. After running #1=#1-1, the value of #1 becomes 19 and the constraints are no longer respected, so it will do this. no return. (X direction changes to 20)
G00X〔#1+1);
#1=#1-1;
END1;
2) The IF statement goes forward
Example: N1 #2=#2-1;
G01X〔#2〕F0.2 ; Suppose that when the machine tool reaches this sentence, #2=20, it will continue to execute until SI〔#2 GE 20]GOTO1 ; N1 #2=#2-1;Current X value will become 19, which no longer satisfies the constraints, then execute another one
G01X〔#2〕F0.2 ; Finally, run the following program (X direction has been reduced to 19)
G00X〔#2+1) ;
IF〔#2 GE 20〕GOTO1 ;
3) As shown in the slotting program above, the IF statement contains significantly fewer words than the WHILE statement.
4) Due to the different return directions, the WHILE statement must be read one sentence less and the IF statement must be read one sentence more during processing.
4
Application of the SIEMENS system macro program (tower)
Note: Macro programs are programmed with variables and the Siemens system variable number is represented by R.
For example, written using ordinary programming methods: G01X-10
This can be expressed as follows: using a macro program:
R1=-10
G01X=R1
Conditional transfer:
IF GOTOB: jump backwards
IF GOTOF: jump forward
Written using ordinary programming methods
GO1X100
The variables can be expressed as follows:
R1=0
AA:R1=R1+1
G01X=R1
IF R1<100 GOTOB AA
R1 is an independent variable with an initial value of 0. R1=R1+1 means that the incremental value of the independent variable is 1. Each time the program goes through this line, the value of R1 increases by 1. R1<100 is the conditional expression IF R1<100 GOTOB AAThis line means that if the independent variable R1<100, the program goes back to the mark: AA.
If R1 is greater than or equal to 100, the program stops.
Macro programs can be used in G90 and G91 modes, but their meanings are different, for example;
R1=0, G90R1=R1+1, G1X=R1, the value of X is 2 after the second pass of this program.
R1=0, G91R1=R1+1, G1X=R1, the value of It is 2, but in G91 mode it is based on the previous one.
(1) Grooving
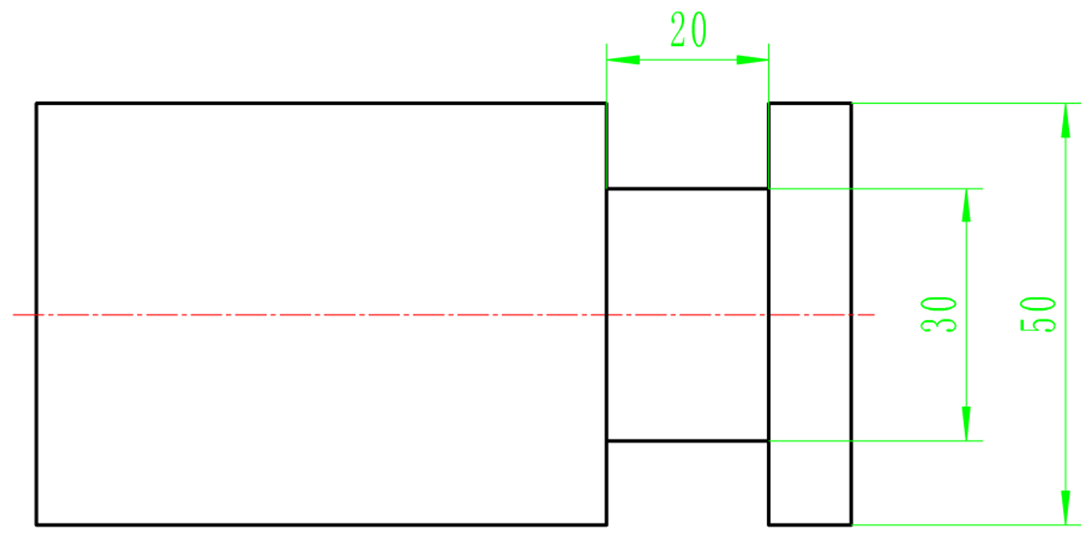
T1
CT
T1D1
G0G40X100Z100
M03S1000
G0X54Z2
Quickly reach the starting point
Z-10
R1=3
Set blade width to 3mm
R2=-10-R1-0.2
The starting point of the knife is -10, and the left side of the blade is used when adjusting the knife;
For tool setting, the blade width must be subtracted and 0.2 is the finishing allowance.
G1Z=R2F0.1
The tool reaches the starting point of the Z axis
AA:R2=R2-2.5
R3=50
The X axis of the slot starts from the point
BB:R3=R3-2
Set the cutting depth of each tool to 2 mm
G1X=R3
X=R3+1
Every 2mm cutting depth, 0.5mm chip removal on one side
IF R3>30+0.4 GOTOB BB
Set the groove depth to 10mm. If R3 > 30 mm, the program moves back to the BB mark and 0.4 is the finishing allowance.
G0X50
The tool reaches the starting point of the X axis
G1Z=R2
IF R2>-30+0.2 GOTOB AA
Set the groove width to 20mm and 0.2 is the finishing allowance.
G0X50
G01Z-13
finishing
X30
Z-16
G0X50
Z-30
G01X30
Z-16
G0X50
Remove the knife
G0X100
Z100
M05
M30
(2) Ellipses
1)Basic format
R1=0
Set the initial value of variable R1 to be 0
AA:R2=b×SQRT(1-R1×R1/a×a)
According to the ellipse equation, a is the major semi-axis of the ellipse, b is the minor semi-axis of the ellipse, and SQRT is the sign of the square root.
G1X=±2×R2+XZ=R1-Z
Set the position and shape of the ellipse, +2 is convex, -2 is concave, X and Z are the distances (in diameter) between the part axis and the ellipse axis respectively.
R1=R1-1
Set the distance of processing steps
IF R1>=n GOTOB AA
If the variable R1
2) Programming example:
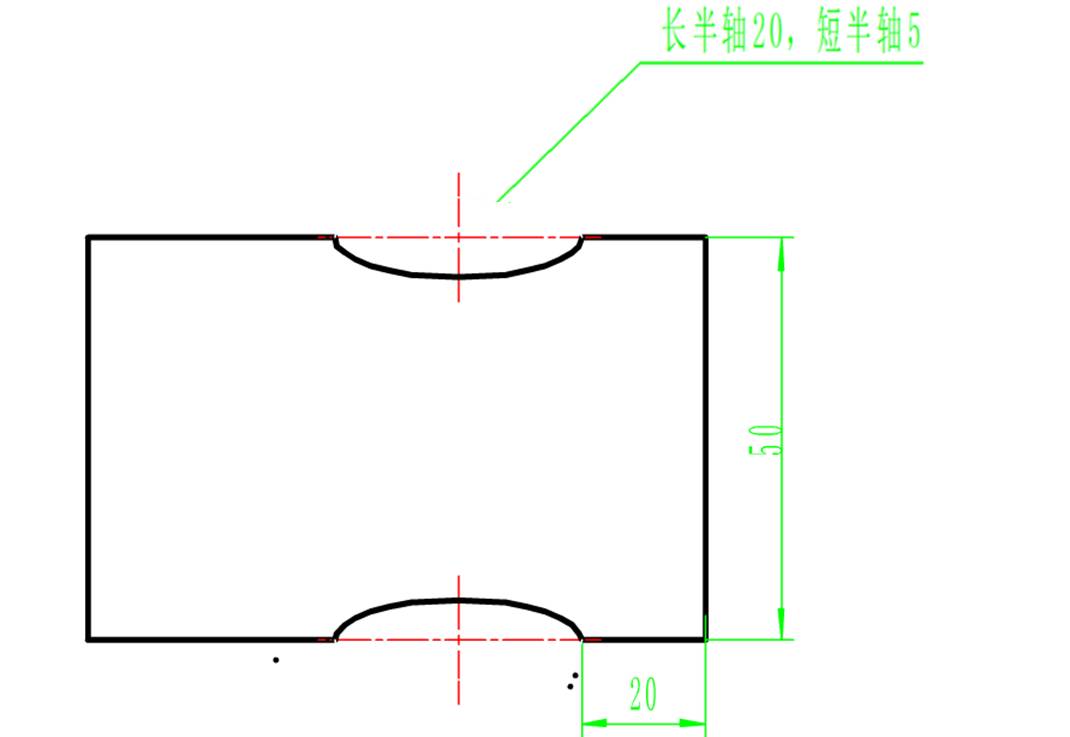
T1D1
G0G40X100Z100
M3S1000
G0X52Z2
Z-20
CYCLE95( )
G42S1500
AND:
R1=20
AA:R2=5×SQRT(1-R1×R1/400)
G1X=-2×R2+50 Z=R1-40
R1=R1-2
IF R1>=-20 GOTOB AA
PP:X42
G0G40X100Z100
M05
M09
M30
(3) Parable
1) Basic format:
R1=0
Set the initial value of variable R1 to 0
AA:R2=SQRT(-R1×n)
Obtained according to the basic parabola format, where SQRT is the square root symbol and n is the coefficient
G01X=2×R2+n
Z=R1
Processing path, +2 is the convex shape, n is the starting point value of the X axis
R1=R1-1
Variable increment value is 1mm
IF R1>-30 GOTOB AA
If variable R1>-30, the program goes back to the mark: AA
2) Programming example:
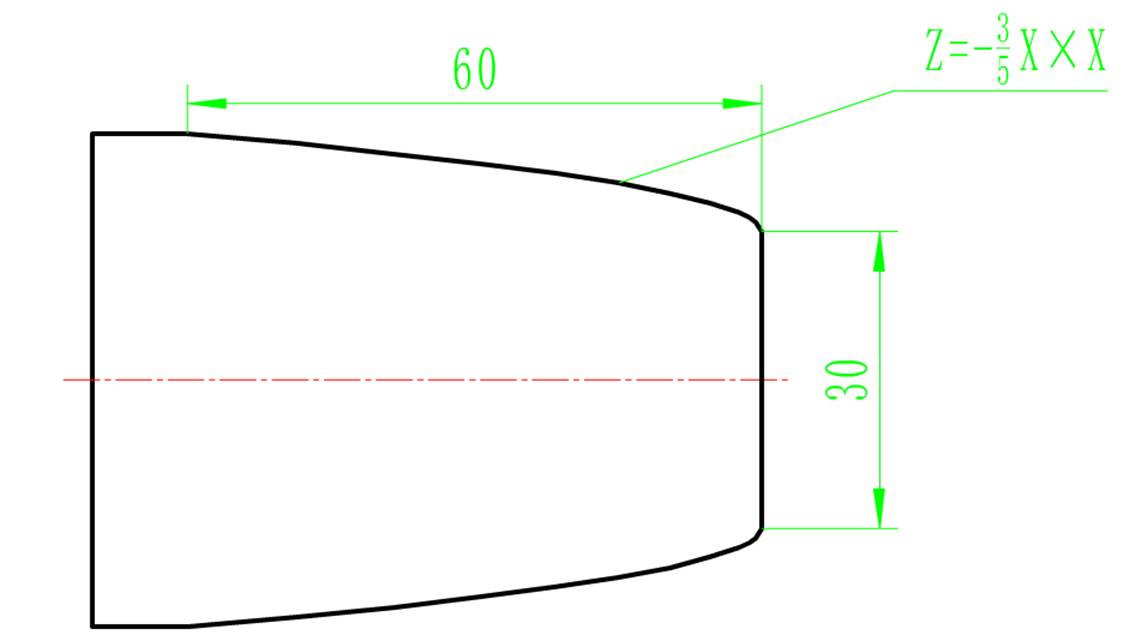
T1
Tc
T1D1
G0G40X100Z100
M03S1000
G0X52Z2
CYCLE95( )
G0G42
OO:
R1=0
AA:R2=SQRT(-R1×5/3)
G01X=2×R2+30 Z=R1
R1=R1-2
IF R1>-60 GOTOB AA
PP:X52
G0X100Z100
M05
M30
Daguang focuses on providing solutions such as precision CNC machining services (3-axis, 4-axis, 5-axis machining), CNC milling, 3D printing and rapid prototyping services.
