G-code refers to commands that tell the 3D printer how to print 3D objects. G-code typically describes printer settings such as speed and temperature, as well as the geometry of the 3D object. Convert STL or other 3D file types to G-code files using a slicer like Cura. However, the reverse process, from G-code to STL, is less common.
The main reason to do this is if you have a rawG-code files for 3D STL files. Conversion in this direction is an error-prone process of experimentation, and errors are often encountered during the conversion process. It is therefore often necessary to adjust the conversion settings to achieve ideal results.
For example,G-code files often contain partially unrelated information, such as support. When using a G-code to STL converter, these features will remain in the generated STL and will need to be manually removed in 3D editing software such as Fusion 360 to fully restore the original STL file.
Although the number of programs for this task is limited, a new player has emerged in this field that could make the conversion process even simpler and user-friendly:Gcode2l. In this article,magic monkey networkWillLearn this with everyoneA browser-based tool to see if it really works since Recover 3D models from STL files.
aboutGcode2l
(source:Brijesh Gurav of All3DP)
Gcode2l is a versatile online tool designed to convert G code back to STL files. Its unique value proposition lies in its free operation, user-friendly accessibility, and efficient performance in decrypting G-code files. The simple interface and simple operation require no in-depth knowledge of G-code or STL files, making it a versatile tool for both novice and experienced users.
but,Gcode2l also has its limitations. According to the creators, the tool was mainly tested with files generated by PrusaSlicer, Slic3r and Cura. Although it can handle files from other slicers, it may end up producing more artifacts. We tested files made with Simplify3D and the results were satisfactory, but details may vary, especially between models.
Also,Gcode2l does not support converting multiple models into a single file. In this case it converts the file but only the largest model in the group can be displayed in the resulting STL file.
In summary,The results of Gcode2l might surprise you. Next, we’ll walk through an example conversion to help you understand how to use Gcode2l effectively and give you an idea of what you can expect.
Convert toSTL
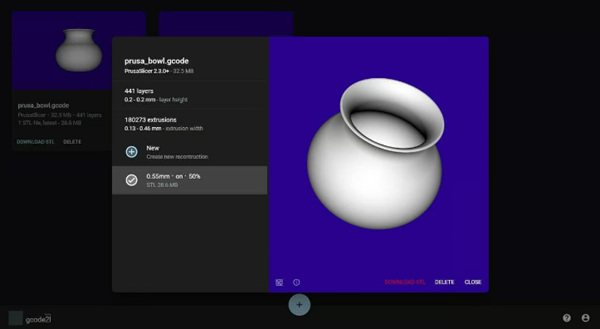
try it Two examples of files in Gcode2l! (Source: Brijesh Gurav via All3DP)
For the case study, we chose the widely recognized system Benchy 3D as an example model. Given its popularity among 3D printing enthusiasts, it is an excellent candidate for demonstrating the capabilities and limitations of the Gcode2l tool. Now let’s move on to the step-by-step guide.
Gcode2l workflow
By navigating to Gcode2l website to start your process. You may choose to sign in for the sole purpose of connecting files to your account for easier management, but this is not required. You’ll also see an introductory splash screen that briefly introduces the tool, describes its current limitations, and provides a help section. Once you have passed this interface, you can proceed to download the G-code file.
1、Click on the blue at the bottom of the page Use the “+” symbol to upload your own G-code files, or click “Import Test File Set” to view sample files.
2、You will have to wait while the file is processed to get metadata such as the slicer used, file size, layer thickness, number of layers, and extrusion width. Once processing is complete, the file displays “No preview” is normal.
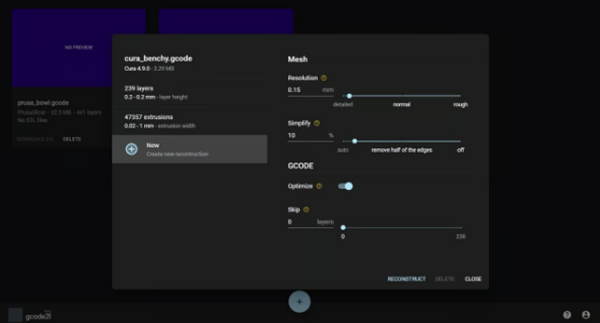
3、Click on the downloaded file to open it The “Rebuild” menu, where you have access to several adjustable parameters (we will come back to this in more detail later).
4、When you are satisfied with the settings you have selected, click “Rebuild” and let Gcode2l work its magic.
5、Once the reconstruction is complete, it will be displayed in the preview window and you can drag to rotate it and check the results.
6、If you are satisfied with the results, click “Download STL”, or start a new rebuild and adjust the settings as you like. It’s that simple!
Reconstruction parameters
The settings for reconstruction are difficult to master (source:Brijesh Gurav of All3DP)
No single settings profile can be applied to All cases of STL file reconstruction. The correct settings depend on the model size, amount of detail, and other extrusion instructions included. Here are four settings you can try with Gcode2l:
resolution: After reconstruction The resolution of the STL can be adjusted with a slider from “Detailed” to “Coarse” or by entering a specific value in millimeters. If you know your model is rather small, the resolution should be closer to “detailed” and for larger models the resolution should be increased to avoid long reconstruction times.
simplify: The second slider can reduce model complexity and file size by removing excess edges. The input percentage reflects how much of the triangle’s edges will be preserved. You can set it to “Auto” or “Off”, depending on how (and if) you plan to use the reconstructed STL for printing.
optimization: This experimental toggle allows Rebuild to preprocess each layer and remove internal extrusions. This conserves computing resources and speeds up reconstruction, but increases the risk of unwanted artifacts.
cross: To bypass initial layers, such as edges or rafts, you can optionally set the number of initial layers to ignore during reconstruction. Note that this option will only appear if no extrusion code for such a feature has been identified for you.
Don’t hesitate to try all these settings to optimize your reconstruction. For example, try to start with a resolution close to the initial layer size, as large differences between the two can cause holes in the reconstructed model. Although Simplify switching is a basic feature of most models, but when working with models other than the most basic, it is especially important to avoid resource-intensive rebuilds.
Assessment results
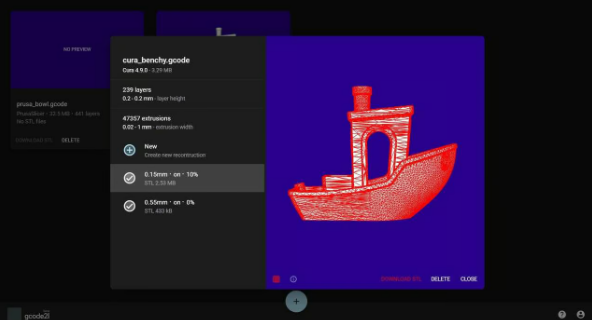
rebuilt STL files are available for inspection! (Source: Brijesh Gurav via All3DP)
Don’t forget,Gcode2l does all the processing on your device. To avoid overcommitting resources, it uses built-in protections to monitor usage and stop rebuilding when consumption exceeds a defined limit. Specifically, if an instance’s memory usage exceeds 8 GB or exceeds 9 minutes, the process will be terminated, preserving your system’s performance. If you’re experiencing processing limitations, you can try lowering the resolution or increasing the “simplify” setting.
Once the rebuild is complete, you can use the The 3D viewer inspects the generated STL file. The viewer even lets you toggle the visibility of mesh edges, helping you evaluate the details of your reconstruction. You can also access important information about the parameters used in the reconstruction, such as layer height and extrusion width, as well as the resources consumed during the reconstruction process.
Write at the end:
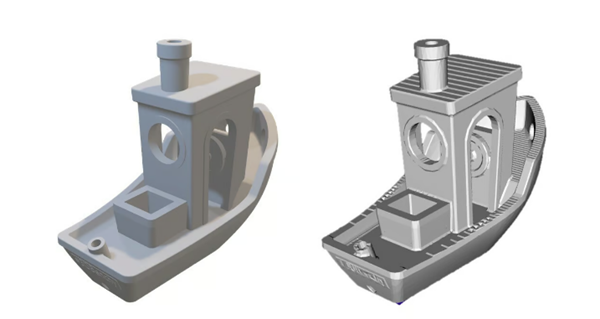
In-person comparison: original (left) and reconstructed (right) (Source:Brijesh Gurav of All3DP)
generated The quality of your STL files is highly dependent on your slicer’s original settings, such as layer height and nozzle size. These settings determine the minimum detail that can be printed, and the reconstructed STL will have the same level of detail. For example, you may notice a stepped effect on any inclined surface due to the layering process of 3D printing. Additionally, complex details such as text and small features may not be fully recovered.
Any supports created during the slicing process will be incorporated into the model, creating a uniform mesh. This usually requires the use of mesh editing software such as MeshMixer) does a lot of cleaning. Please note that the interior walls that separate the model supports do not always translate to STL.
Once all the work is completed,Gcode2l is a great tool for converting G-code files back to STL, and the reconstructed Benchy prints well if printed at lower quality. However, small details such as text are highly dependent on the resolution set before reconstruction. The bottom line is that while this tool has undeniable value in recovering lost STL files, it cannot replace lost data.
Daguang focuses on providing solutions such as precision CNC machining services (3-axis, 4-axis, 5-axis machining), CNC milling, 3D printing and rapid prototyping services.

