Knurling is a manufacturing technique usually performed on a lathe that involves creating complex patterns on the surface of a part. These patterns can consist of straight lines, angles, or interlocking patterns. The knurling process improves the durability and aesthetics of the part while improving its grip. However, be aware that knurling patterns may vary. It can have straight ridges or a spiral arrangement of these “straight” ridges, unlike the more traditional crisscross design.
Knurling is an effective method of remanufacturing parts. In fact, the raised parts of the knurled surface help to reduce the impact of wear on the part. This also comes into play when assembling metal pins into plastic molds.
Knurling is used to make a variety of products such as tool handles, mechanical pencils, pistol grips, barbells, etc. Additionally, knurling is common on dart handles and pedals of BMX bikes. It is also commonly used in the production of surgical instruments.
1. Manual knurling and machine knurling
There are two types of knurling techniques: manual knurling and mechanical knurling. Let’s understand the treatment process separately:
01Hand knurling
Hand knurling requires the use of a hand knurling tool called hand knurling. Depending on the configuration, this tool may contain one or more knurled wheels. Knurled wheels usually come in the form of compact rolling devices whose surfaces are decorated with patterns such as diamonds or diagonal lines.
When the hand knurling is firmly fixed on the material surface and starts to work, the rollers exert pressure on it. This causes deformations and changes to the surface of the material. However, manual knurling has fundamental inaccuracies and its operation must be continuous and uninterrupted to avoid overlapping knurling lines.
This process is typically used for small parts that can be handled manually. Therefore, it produces simple knurling patterns, whereas manual processes produce complex machining.

02Machine knurling
The mechanical knurling technique is performed using a machine, usually a manual or CNC lathe. First, attach the workpiece securely to the lathe. The wheel is then attached to the knurled bracket and secured to the workbench. The machine knurling process involves a wheel contacting the workpiece to create the desired knurling pattern. This knurling operation is carried out continuously and generally without error.
To ensure smooth operation and ease of cutting, the blank is usually lubricated before turning. This prevents overheating and improves the interaction between the blank and the cutting tool. Additionally, constant chip removal must be maintained to prevent buildup, which could lead to machine interruptions and faults.
Machine knurling can accommodate parts of different sizes, lengths and materials. The use of precision tools and feeding devices enables the production of complex knurling patterns with fine spacing and ensures tight control of dimensional accuracy.
2. Knurling process
Knurling technology requires the use of specialized knurls to produce the desired pattern on the surface of the part. The following describes how the process is carried out:

Step 1: Choose the Right Part Material
The material should be malleable enough to move when pressed with a knurled tool. Aluminum, brass, mild steel and various plastics are commonly machined materials. Harder materials may require the use of special knurling tools and slower speeds.
Step 2: Choose the appropriate knurling method
Manual knurling and mechanical knurling are the two most common knurling methods. The first uses a small roller tool that is pressed against the surface of a part to produce the desired pattern. The latter uses a lathe to cut the desired pattern on the part. Hand knurling works best on softer metals, but mechanical knurling achieves finer detail in harder materials.
Step 3: Install the wheel or tool
Knurled wheels are available in a variety of tooth shapes, angles and materials to accommodate a variety of uses. The shape of the tooth determines the pattern and strength of the knurling. They are held in place by knurled brackets mounted on the workbench. The knurling tool contains a mirror image of the intended knurling pattern.
Step 4: Install the artifact correctly
The workpiece is held between the centers or in the lathe chuck. The workpiece must be clamped properly to prevent it from slipping under the pressure of the knurling.
Step 5: Perform the knurling operation
The rotating part is powered smoothly by a wheel or knurled tool. To achieve a uniform knurling effect, vertical alignment and consistent pressure are crucial. The surface of the material then deforms as the wheel or tool continuously feeds the part while applying constant pressure. This results in ridges or depressions on the surface of the part. In harder materials, sharp, high knurling may require multiple passes.
3. The art of knurling
01 straight/standard knurl

Straight knurls can carve straight lines and groove patterns into the surface of workpieces. The technique generally involves creating intersecting lines (parallel or diagonal) with a specialized knurling tool equipped with two hardened wheels with diagonal teeth.
The linear knurled pattern can be used as a decorative pattern to enhance the visual appeal of various room surfaces. This technique is ideal for cylindrical objects such as handles and knobs. Additionally, it proves to be a suitable choice for a variety of uses, including luxury writing instruments, personalized hardware or jewelry, giving it an elegant and stylish look.
02 Diagonal knurling

Diagonal knurling is a specialist processing method used across a wide range of industries to impart textured patterns or gripping properties to cylindrical or rounded surfaces. It is divided into two categories:
Left diagonal knurling
When viewed from the end of cylindrical objects, they have diagonal ridges angled from the upper right to the lower left. A knurling tool configured with edges matching this pattern is used to create a left-hand knurl. These special dials do their job in situations where counterclockwise rotation or rotation represents the preferred direction.
Diagonal right hand knurling
When viewed from the ends of cylindrical objects, they have diagonal ridges angled from the upper left to the lower right. These knurls are formed using a knurling tool with ridges that fit in that direction. Right-hand knurling is generally used in clockwise rotation or rotary motion.
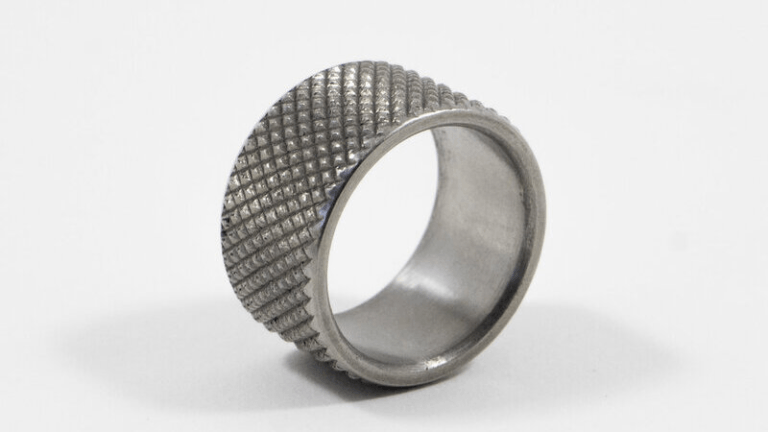
03Diamond knurling

Diamond knurling is a standard method of creating a pattern of small diamond-shaped ridges or indentations on the surface of a workpiece. This involves joining crossed diagonals to form several diamond-shaped projections. A single diamond knurled wheel improves the wear resistance and overall durability of the workpiece and is widely used in machine parts, tools and decorations that have frequent contact or high friction.
Diamond-shaped indentations or textures evenly distribute pressure and wear, reducing the risk of damage or damage. The technology produces intricate and beautiful knurled patterns on machined components such as bicycle parts, lighter housings or personal accessories.
04Special knurling

With concave knurling, the teeth of the knurled wheel have a curvature toward the center of the wheel surface. This configuration is typically used to axially engage and manipulate a single part of a part.
On the other hand, convex knurling is more suitable for long transverse knurling operations. Its rounded shape facilitates smoother movement across the surface of the part.
Bevel knurling is another variation that consists of angled or beveled ridges that create a distinct beveled edge on the workpiece. These special types of knurling are often used for aesthetic or practical purposes.
4 practical advantages of knurling

01Improve grip and safety
The knurled surface increases surface friction for a secure grip even in slippery conditions. This increases security and control. Knurling components such as bolts, knobs, wheels and rollers helps prevent slipping during assembly or use.
02Aesthetic improvement
In addition to its practical benefits, knurling can also add beauty to an object. Knurling creates a visually appealing and exciting looking textured pattern.
03Improve paint adhesion and brand awareness
Knurling increases the surface area of the material, which is beneficial for brand identification and paint adhesion. The textured surface improves paint adhesion for longer lasting results. Manufacturers can also use knurled patterns to add an element of brand identity to their products.
04Availability of features in various industries
The knurling process benefits many industries. From piping equipment to automotive components, the knurling process is used in a wide range of engineering and manufacturing applications.

5 challenges and limitations of knurling processing
01Material considerations
Not all materials are suitable for knurling. When deciding whether or not to use knurling, the hardness and flexibility of the material must be considered. Some materials, particularly soft plastics, may not withstand this process and may become warped or damaged.
02Surface finish and precision requirements
Knurling it precisely and applying a proper surface finish can be a challenge. This technique may leave burrs or other imperfections. Some procedures require additional machining or surface treatment in order to meet quality standards.
03Potential weakening of the surface
Knurling can sometimes weaken the material, especially if it has an intricate design or is used on fragile materials. Engineers and manufacturers must carefully weigh the tradeoffs between increased grip and potential structural defects when using knurling.
Daguang focuses on providing solutions such as precision CNC machining services (3-axis, 4-axis, 5-axis machining), CNC milling, 3D printing and rapid prototyping services.


