Mohou.com has already received many questions about how toThe problem of adding threading features to 3D models of 3D printed parts. Today this article will learn with you how to add wires to plastic and metal parts during 3D printing.
A,plasticPrintAdd wires to parts

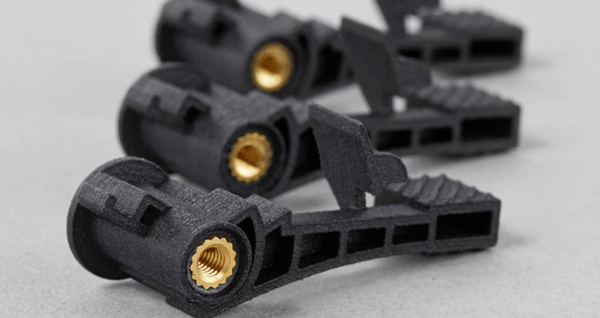
UNITED KINGDOM.3D printing services company 3D People claims that metal wires in thermoset inserts are more durable than plastic wires (Source: 3D People)
In this article, we’ll discuss options for professional and industrial applications.
The first option is to print the part without wires and then tap them. Tapping uses something similar to a drill“Tap” or “thread mill” The process of creating threads in the hole of a screw or bolt. It essentially carves a precise thread design into the hole during advancement. This is an option for parts that need to be screwed in once and stay in place. Continuous insertion and removal of screws can wear threads.
If you have an existingThe CAD model contains threads, remove them and size the hole slightly smaller than the tap size corresponding to the threads you wish to cut. You can find charts of standard tap and drill sizes for machining online or in apps, and they will also work for 3D printed parts. For best results, ream the hole before using a hand tap.
Self-tapping screwsalso called self-tapping screws, can be inserted into negative elements without any part preparation. Follow the manufacturer’s hole size guidelines. For those made from polymers with some elasticity (like nylon)For 3D printed parts, these screws are a good choice.
If you need stronger threads, brass or steel inserts are your best choice. These inserts are available in a variety of styles.
thermoset insert(also called hot melt inserts) are installed using a soldering iron, which heats the insert and the plastic surrounding it. Press the insert into the softened plastic until it is flush with the surrounding surface.
For stereolithography(SLA) or any type of resin printing, the best choice is a spiral expansion insert because these resin materials are affected by high temperatures.

Screw expansion inserts used on Markforged 3D printed continuous nylon and carbon fiber parts (Source: Markforged)
All inserts should be removed from the file when uploading to the printer to prevent them from being accidentally merged with the part.
Hole access is a key factor in the design of tapped and heat-set threads. If there are other features in the hole that prevent entry of the threading tool, it will not be possible to thread or install the insert.
When it comes to inserts, there are a few additional things to consider. The diameter of a given insert is always greater than the diameter of the thread. You want to make sure there is enough space around the hole so the insert doesn’t poke through the surrounding wall.
ForSLS and MJF, please consider the geometry around the hole that receives the insert. Often the insert doesn’t seat all the way, so you can use a soldering iron to adjust the alignment after you press it into the part. Because of the heat and handling required to ensure they line up correctly, you’ll want to leave plenty of space between the insert and adjacent items so that nothing accidentally melts during the process.
Ideally, if the plugin has functionality on all sides, it should be surrounded by0.25 inches (6.35 mm) of space. However, if the insert is close to a wall but there are no other items nearby, the wall may be closer because there is enough space in all other directions to install the insert without damaging the wall.
ifYou are on momon.com3D printed parts,Please inform the manufacturer that you want holes or threaded inserts, but do not include them in the model. Instead, include formal drawings, quick annotations, or screenshots. Indicate the size and location of the wire.
Another option is to design your part to fit a standard steel nut. To do this, you can directly print the corresponding nut holder or nut groove.

USA3D printing services company DI Labs used Multi Jet Fusion technology to print these valve bodies, which feature fine threads that require a tight fit (Source: DI Labs)
direct3D printed yarns
Now let’s talk about impression threads, which will eliminate the extra steps and work of tapping and inserting, and can be ideal for parts that only need to be assembled once or rarely (without repetition) with screws.
If you want to print wires in your part, the bigger the wires, the better.
As for the smallest line that will work after printing, it will vary depending on the specific machine you are using and the machine settings. The best approach is to consider the application requirements and use them as a guide to create a wireframe approach.
You should also ensure that the threads you use can be successfully constructed and that no support occurs between the thread teeth, as supports between the thread teeth that cannot be completely removed can affect the operation of the thread. thread. Even if the build is oriented so that the threads print vertically, there is no guarantee that the threads will print without support.
Be sure to check the minimum feature sizes for your chosen material and technology. Any tapered area of the thread smaller than this minimum size will not be formed. If you consider the minimum feature size, there is a good chance that the thread will work as expected.
Regardless, be sure to consider post-processing when designing and printing threaded holes. For example, how much warping or shrinkage should you expect? Do you have support structure in your hole, how will removing it affect the dimensions or edges of the thread?
two,Adding Wires to Metal Printed Parts

MetalFine details and tight tolerances can certainly be achieved with 3D printing, but threading is often a unique problem (Source: University of Oulu)
As with plastic parts, tapping is an option, but another option for functional threads on metal parts is to print the threads and then engrave them by hand. This is called“Thread trimming” involves running the tap through the existing thread to remove (remove) any excess material. This also works for other materials, but it’s less common.
Metal powder bed fusion technology, e.g.LPBF (also known as SLM and DMLS) and electron beam fusion (EBM) have a rough surface similar to castings, which can prevent threads from functioning properly. Using taps, you can better define and ensure the dimensional accuracy of the thread or compatibility with corresponding parts.
You should also check the minimum feature size of the material and the resolution you plan to use so that there is enough wire shape to achieve the chase.
Another option is to tap to installHeli-Coil inserts (also available in polymers). These are threaded inserts made from coiled wire used to repair or reinforce threaded holes in metal or other materials. They provide strong, wear-resistant internal threads that often exceed the strength of the raw material, making them ideal for 3D printed parts. They are typically used on metal parts, plastics, wood or composite materials whose original threads have been stripped, damaged or require reinforcement.
If you submit digital files to3D printing service and you want them to add threads to your part after construction, be sure to let them know which holes require threads.

Difficulty removing support is often due to metalReasons why 3D printing wires have become impractical (Source: Mitsubishi Electric)
direct3D printed yarns
In our experience, printed wires rarely work due to material loss and rough surface preparation. Even if printed wires work technically, they may not meet the tolerance requirements of the project.
Ultimately, the best way to decide how to add threads to a part is to start with the thread requirements. Is the thread a single assembly or will it be used over and over again like the threads on a light fixture? How much load can the wires support? How precise should the fit be? How scalable should a threaded solution be?– This might work for one room, but is it still practical for 200 rooms? Each method of adding threads has advantages and disadvantages in terms of fit and mechanical properties, but also in terms of cost and equipment required. Although there is no one-size-fits-all recommendation, many options are available so you can choose the one that best suits your project.
Daguang focuses on providing solutions such as precision CNC machining services (3-axis, 4-axis, 5-axis machining), CNC milling, 3D printing and rapid prototyping services.


