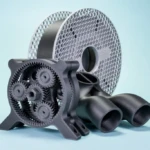
3D printing has revolutionized the world of manufacturing, prototyping, and hobbyist creation. Among the various printing technologies available, Fused Deposition Modeling (FDM) stands out due to its accessibility and ease of use. This article will be a comprehensive guide to designing for FDM 3D printing, using Acrylonitrile Butadiene Styrene (ABS) as a material example.
Understanding FDM and ABS
FDM is a widely utilized 3D printing process that works by extruding thermoplastic filament layer by layer to produce a three-dimensional object. The printer melts the filament and deposits it onto a print bed, building the object from the ground up.
ABS, a popular material in FDM printing, is known for its durability, heat resistance, and impact resistance, making it an excellent choice for functional parts, prototypes, and even finished products. However, working with ABS requires careful design consideration to ensure optimal printing success.
Material Properties of ABS
Before diving into design guidelines, it’s important to understand the properties of ABS:
- Thermal Stability: ABS can withstand higher temperatures compared to PLA, making it suitable for environments that experience heat.
- Durability: This material is tough and can endure impacts, making it ideal for parts that require strength.
- Post-Processing: ABS can be smoothed using acetone vapors, offering a seamless finish and removing layer lines, a common issue in 3D printing.
Design Guidelines for FDM Printing with ABS
1. Part Orientation
Part orientation significantly impacts the strength, appearance, and print time of your ABS part. When designing your object:
Identify Load-Bearing Axes: Determine how the part will be used. Align the strongest axis vertically to maximize strength. For instance, if printing a bracket, ensure the flap that will bear weight is oriented to minimize displacement.
- Reduce Overhangs: Every layer needs a foundation. Minimize overhangs and create features like support structures if necessary. The 45-degree rule can reduce the need for support, providing more reliable results.
2. Wall Thickness and Infill
The wall thickness and infill density play crucial roles in the strength and weight of your model:
Wall Thickness: For ABS, a wall thickness of 1.2 to 2 mm is advisable. Thicker walls improve durability but add weight. Consider the balance between strength and the material cost.
- Infill Patterns: The type of infill can alter your model’s weight and strength. Common patterns include grid, honeycomb, and line. Honeycomb is efficient for structures needing maximum strength at a lighter weight. A density of 20-30% is typically suitable for most applications without excessive material usage.
3. Designing for Supports
Since ABS can warp, careful support design is critical:
Support Structures: Include built-in supports in your design for any overhangs. These can be easily removed later but will provide the necessary strength during the build process.
- Support Removal: Design elements that will facilitate easy removal of support structures, such as leaving space between the body of the part and the supports.
4. Bridging and Overhangs
Bridging occurs when the printer needs to create a connection between two points without any support, often leading to sagging:
- Reduce the Length of Bridges: Design to limit the length of bridges. If a gap is wider than 10 mm, consider adding supports or breaking the part into smaller segments.
5. Temperature Management
ABS is sensitive to temperature changes during printing:
Heated Bed: Always use a heated bed to prevent warping. Set it to approximately 80-110°C to maintain adhesion.
- Enclosure: Creating an enclosed environment around the printer can help maintain stable temperatures, minimizing shrinkage and warping.
6. Layer Height and Print Settings
The layer height affects both the surface finish and print time:
Choose Layer Height Wisely: While lower layer heights yield smoother finishes, they also increase print time. Typical settings for ABS range from 0.1 to 0.3 mm, depending on the desired quality.
- Print Speed: Slower print speeds enhance accuracy and cohesion, especially with ABS. Aim for a speed of around 30-60 mm/s as a starting point, adjusting based on your specific printer’s capabilities.
Post-Processing ABS Parts
Post-processing is essential for achieving a polished final product:
Smoothing
Using acetone can help smooth rough surfaces. Place your model in a sealed container with a small amount of acetone; the resulting vapors will create a glossy finish without requiring extensive sanding.
Painting
ABS can be painted after processing. Use primer specifically designed for plastics to ensure a good base for paint adhesion. Acrylic paints are a common choice for their ease of use and availability.
Assembly
For larger models, you may need to glue parts together. Use ABS solvent cement for a strong bond, or employ cyanoacrylate glue for faster assembly.
Troubleshooting Common FDM Issues with ABS
While designing for ABS, it’s crucial to be aware of potential issues that may arise:
Warping
- If uncontrolled temperature variations occur, ABS parts may warp. Adjusting your print environment and carefully planning print orientation can minimize this.
Stringing
- During the printing process, you may notice strings of filament between parts, known as stringing. To combat this, fine-tune retraction settings, and experiment with different speeds.
Layer Adhesion
- Ensure layers bond properly by regulating temperature settings. Insufficient heat can result in poor adhesion, weakening the overall integrity of the part.
Conclusion
Designing for FDM printing with ABS can yield robust and durable parts suitable for various applications. By keeping in mind the best practices covered in this guide—such as part orientation, wall thickness, and temperature management—you can significantly enhance your chances of a successful print. With some planning and practice, creating high-quality, functional 3D print designs is well within your reach. Embrace the possibilities that 3D printing with ABS brings, and let your creativity flourish!
Daguang focuses on providing solutions such as precision CNC machining services (3-axis, 4-axis, 5-axis machining), CNC milling, 3D printing and rapid prototyping services.